Warung Bebas

Wednesday, April 8, 2009

呢個問題竟然係 mobile rack!

Mobile Rack


最近遇到一部新機用緊兩個 mobile rack(每隻 HDD 一個 Windows),出現左個奇怪問題:


  • 其中一隻 rack (HDD) 開機 load Windows XP 條 bar 要等好耐好耐

  • 用 Windows 有時會 hang 機

  • 事件檢視器出紅色 disk controller error (非壞磁區)

  • 重新開機有時會認唔到 harddisk, DVDROM, 甚至 VGA


首先見 Windows 咁樣就試重裝,無事,但入 Windows 依舊慢


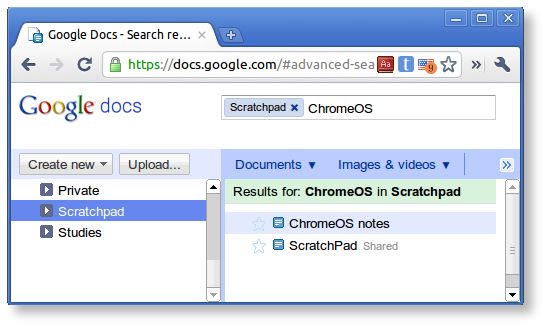
掃瞄兩隻 HDD, 無事 (之後再順便 run 埋 memtest, OK)


咁都 OK 就開始用心處理個問題啦. 試試換 SATA 資料線, OK! 只要上下兩隻 rack 的 cable 掉轉次序,咁發生問題 (Windows load 得耐) 既就變左另一隻 rack. 不過,無論嘗試換幾多條 cable,情況竟依然沒改善 (亦有換 power cable, 轉 SATA port 位)


之後留意到佢只係下面隻 rack 插任何 HDD 先有問題,就試試換埋 mobile rack mount,但仍無改善.


沉...


之後便懷疑到 power supply (牛魔王),因為有時 reset 後會認唔到晒所有野(都是之後才知道有這徵狀)。換牛後的確好左! 為了確定,逐不定時試開機入兩隻 rack(HDD) 內的 Windows 二十次,全部成功。但係,當諗住可以收工時,最後一試竟然又變返原來咁樣...


換埋主機板,通常古怪既問題都可以係板。結果換完重衰,boot 唔起機添 (無畫面, 無 beep)。發現當 SATA cable 由底板拔除後始能著機有畫面,所以推斷係插住的兩個 SATA mobile rack 導致的。


SATA mobile rack 唔係直出既咩? 竟然都有咁既問題. 係佢地質素差定係板唔夾? 用貴 d 既 rack 或者 eSATA 裸族又會唔會有呢個問題?


部機 config:


  • Gigabyte P42-RS3G (P43+ICH10)

  • Intel Q8200

  • 2GBx2 RAM (OCZ, DDR2 800)

  • 1TB Hitachi HDDx2

  • Galaxy 9500GT

  • Samsung DVDRW

  • Internal card reader

  • 2themax XPR500 power supply


學到幾樣野:


  1. Mobile rack 會導致咁奇怪既問題... 可免則免.

  2. 事件檢視器出紅色/黃色非壞磁區既 disk error 雖然通常仲用得無問題,但中間既連接可能已經降了 grade


歡迎用以下方式儲存或分享本文:


Share


Thursday, December 11, 2008

Transcend 300x SLC vs 133x MLC CF vs 1.8" 4,200rpm HDD


小弟最近買了張 Transcend 300X SLC CF 來做(偽)SSD,順道試試驗證一下 flash memory (快閃記憶) vs 硬碟各自的優劣。(問題:現時是否值得用 SSD 取替硬碟?)


Transcend 300X, 133X, Compact Flash, CF使用 FDBench測試 - 沒有漂亮圖表,但一個畫面就可以一併顯示連續讀寫和隨機讀寫等等,個人覺得對快閃記憶測試較有意思。


1. 300x SLC 對 133x MLC (使用 CF to 3.5" IDE 轉換器於桌面電腦測試)


Test, FDBench, Transcend 300x 16GB SLC CF
Transcend 300x 16GB SLC CF


Test, FDBench, Transcend 133x 2GB MLC CF
Transcend 133x 2GB MLC CF


留意到幾點:

  1. 紅色圈內的連續寫入速度就是 SLC 和 MLC 的效能分野了。但值不值幾倍的差價呢? 至少 SLC 可用來跑OS,MLC則沒這個可能。


  2. 藍圈內左邊的隨機寫入速度和右邊的隨機讀取速度形成強烈對比,盡顯快閃記憶消除區塊 (erase block)特性的效能問題。


  3. 133x MLC CF 的讀取速度(隨機/連續)想不到也真的很快,應該是 Transcend dual-channel (雙通道) 技術之功。估計用廉價的 133x 來跑 ReadyBoost/eBoostr 也不錯,因為它們對寫入的要求較讀取低。


Compact Flash adapter, 1.8inch Mobile Hard Drive


2. 300x SLC CF 對 1.8" 4,200rpm 硬碟 (使用 CF to 1.8" IDE 轉換器於手提電腦測試)


Transcend 300x 16GB SLC CF


Performance, 1.8inch Mobile Hard Disk
Toshiba 4,200rpm 1.8" 30GB HDD (model: MK3004GAH)


可見到:

  1. 紅圈和藍圈:硬碟因機械原理的關係 seek time (搜尋時間)比起電子原理的快閃記憶高很多 (18ms vs 0.3ms),導致的問題就是隨機讀寫較慢。


  2. 硬碟因不用 erase block 拖慢寫入,所以隨機或連續讀取和寫入數值都是一樣的 (13和13,6和6)。相反快閃記憶那邊讀和寫都有很大分別 (47和10,39和4)。


  3. 就連龜速的 4,200rpm 1.8" 硬碟的隨機寫入速度也要比 300x SLC CF 快 (6MB vs

    4MB)。不過真實使用過發現換了 SLC CF 後大部份時間明顯較順,除了像因程式暴漲而寫入虛疑記憶體,那時會慢得像當機;寫入動作不大的話就快了。

註:不知怎的,CF 在筆電的連續寫入速度比在台機以 CF-to-IDE 測試時慢很多(隨機讀取則差不多),但讀取速度就反而快點,可能是兼容問題吧。雖然寫入還慢過 1.8" HDD 一點點,不過憑著隨機讀取優勢,整體應用 CF 仍快不少。


3. 後記

曾對自己說過不會花巨額金錢購買現時技術尚未成熟的(偽)SSD,最終還是敗了,無論說手提電腦的硬碟有壞磁 (隔離了也可以用啊),抑或那是以多麼優惠的價格購得,這些都只是藉口 (這是小弟自2000年以HK$999購入 64MB CF 卡後第二次做的傻事。可預見將來看見這卡的感覺會和現在看著那張 64MB 卡感覺一樣,無奈...


Transcend 300X Compact Flash, inside Sony TR1

Flash memory 天生的 erase block 特性會令到寫入慢 (尤其是隨機寫入)。以上的小測試驗正了這問題。以前一直不明白為何高速的USB手指(U盤)在寫入細少檔案時都那麼慢,但大檔案又沒問題,現在明白就是這個原因。


那現時來說,以 SSD 取代硬碟值得嗎? 以這 300x SLC CF 取代 1.8" 4,200rpm 筆電硬碟想是可以的,因為那硬碟本來也實在太慢(只以 UDMA mode 2 跑都已了快不少)。不過,主流桌面電腦用的 3.5" 7,200rpm 硬碟則快多了,跟真正的 SSD 比則各有優劣,但SSD那麼貴,好像不太值得。例如小弟在筆電用,快是快了點,靜和熱量小更是了,但容量也少了一倍啊,在僅有的 16GB 裝完 Vista 及所有應用後仍剩 2GB 空間已很感謝了 (做了不少優化)。通常空間對流動電腦都不是一個主要因素,那會好辦些。


快閃記憶擁有搜尋時間如RAM閃電一般快的優勢,所以隨機讀取比得上連續讀取,這方面比硬碟快得多,但隨機寫入卻因為要erase block而拖慢,這點又比硬碟慢,有得有失。雖然 SSD 近來透過 multi-channel (類似多重RAID 0 原理的技術),使到連續讀取超越硬碟,但仍沒有真正應對 erase block;真正解決 erase block 技術的 SSD 仍有待主流化推出,到時隨機寫入速度或能與隨機讀取看齊;到時才是王道。


如有興趣了解 write-erase cycle、到底有甚麼技術可以應對 erase block,這份 PDF 或會有幫助(英文),不少 concept 小弟都是由那處得來的。或者由外行的我說,其實快閃記憶在每次寫入時除了寫入外還會做消除的動作,而所消除的區塊大小 (block size) 是很大的,e.g. 1GB 有的便要 256KB 一塊,如果有很多很多微細檔案做傳輸,而每個檔案都要做一次完整的 write-erase cycle (簡單可想成每個 1KB 檔變成 256KB),可想而知很多效能都會浪費在 write-erase cycle 上。所以 SSD 寫入慢,隨機寫入更慢。至於解決方法,其中一個是 PDF 中提到一個叫 Managed Flash Technology (MFT) 的軟體件,可以透過地址 remapping 將隨機寫入變成以連續方式寫入,效能提升達 80%!另外硬體的方法,Sandisk 最近亦發佈了 ExtremeFFS 技術,不期望微軟在將來的 NTFS 版本優化 SSD block size,現在自己來達成!


聽說將來的 SSD 將會以 RAM cache (緩存) 配合良好的算法和 wear-leveling (平均寫入) 來改善 SSD 壽命 (另一致命問題) - SLC 和 MLC SSD 壽命只有 10,000 和 100,000 write/erase cycle。另外,將來的 MLC 技術能夠從在一個 cell 弄出更多 bit,容量或能追上 TB 硬碟。種種跡象顯示 SSD 還有很大的進步空間。很期待!


完結前附上 Transcend 300x 的 HDTune //資訊(台機)、Atto Disk Benchmark(台機)、Vista score(筆電)和 CrystalMark(筆電)的測試掃瞄。


歡迎用以下方式儲存或分享本文:


Share


Tuesday, November 25, 2008

VirtuaWin: 虛擬桌面 + 遠端桌面的妙合


虛擬桌面 (Virtual Desktop) 軟體小弟沒用,但很多時候卻需要以遠端桌面 (Remote Desktop) 由一台 PC 連去多台遠端桌面 server。


Server 間左右切換每次都要放隻滑鼠在最頂,等, 按最小化,Alt+Tab,最大化.......

就算用快捷鍵: Ctrl+Alt+Break (還原全螢幕), Alt+Tab, 再 Ctrl+Alt+Break (轉全螢幕) 效率一樣不高。


最近才發現了 VirtuaWin,一款 open-source,Windows 用的 Virtual Desktop 工具。

最喜歡是它有用滑鼠左右切換虛擬桌面的功能 (如右圖),再加上 Remote Desktop session 一起的使用。


先將 四個 Remote Desktop 視窗各轉全螢幕放在 桌面 1,2,3,4。 (如下圖)


滑雪放在"桌面 1"螢幕右邊 0.5 秒便轉"桌面2";

螢幕下 0.5 秒便轉"桌面3";

還可以放在右下角 0.5 秒轉"桌面4"!


完全使用滑鼠單手便可完成。


Remote Desktop 因會霸著鍵盤 input,平時普通快捷鍵方法是轉不到視窗的,但用滑鼠就可以了。

用了遠端功能了那麼久到現在才發現,覺得太酷了,忍不住分享一下。


VirtuaWin 和它的 Portable 版可在以下網址下載:


http://virtuawin.sourceforge.net/


PS: 最好使用圖中 "Enable modifier key control" 功能配合,即按著 e.g. alt 鍵再加滑鼠操作,畫面才轉,以防止畫面跳來跳去。


Another Virtual Desktop Usage


歡迎用以下方式儲存或分享本文:


Share


Tuesday, November 4, 2008

電腦考試用 英文學習方法 + 生字表(MCTS:Vista、Win 7 適用)

為了一位同學,小弟最近竟然製作了這個東西。既然做了,希望可以幫到一些英文底子不好的人就好了。(還想知道有甚麼可改善)


Studying
Image courtesy of Chesdovi


英文生字表


分享上了 Google Docs,任何人都有權批評、有權修改:

http://spreadsheets.google.com/ccc?key=pvK6YSxZ2_umcjT1yzjWvVA


原版 (.xls) 可在這裡下載:

https://docs.google.com/leaf?id=0B5eD2F5GqgybNzkxYzc0ZjgtMzA4MC00MTczLWFiYWUtNDZjMTc1Mzc1NzQ4&hl=en


原版好處是有底線分開字的音節 (Google Docs 不支援底線),與及 Excel 較方便閱讀。(Google 版好像還有其它問題,不少格的紅色重點字消失了,變回黑色。)


前言


這份文件不是為考試的,但也不只是為了學英文,而是為了有能力理解問題,好好讀好課程;想做個有實力的技術員便需要,因為真的很多時會遇到英文,始終不能夠怕。(但倘若真的沒有時間,那麼只好看紅色字吧。)


適用程度


低至中。這是由想想一位不懂英文的人會對甚麼生字陌生而選製的。


學習方式


(抱歉,因本人懶惰關係,可能會較多廣東話,因本來整篇都是用廣東話寫的)


要記那麼多的英文字的確不易,所以就算不懶惰都要想想法子怎樣才能以最少的力去記到最多的字,最後便構思成了這個表。每一行都是相關的字:相反的、相關的、變化的(不包括動詞式, 即 +ing, +ed 等太簡單、千篇一律的就例外)。


記相反、相關詞節省記憶:例如 "lost" 一定要知它的相反 "found","lost and found" (失物換領處) 經常都是一起講的;一起記下相近外型 / 意思 / 讀音的字便會省下腦內的記億空間。又例如 Vista UAC 內 credential 與 consent,和 Network Location 內 public 與 private 都是一組相反詞,所以放在「相反」欄內。(前者在 Vista 下算是吧,給老師見到一定罵...)


以音節記,不懂的字也能發音:將字分開成一個個音節來讀、記會較好(所以表內的字大都包括分割音節的底線)。字雖然多,但都是由同一少堆音節組成的,只要懂得這原理便可輕鬆應付未知的字的發音,所有字也不用怕。例如我剛遇見一個新字 minister (部長),但仔細看那是包括在無人不識的 administrator (管理員)之內的;只要認識 ad-min-ist-rat-or,只要理解音節,原來已經會讀 min-ist-er 了。其它英文都是這樣。


同時認識所有可能變化:既然學懂 administrator (管理員),那麼以下的字也都未學先懂了:admin, administer, administrate, administration, administrative, administratively -- 他們也都是相近意思,只要對英文字的變化有所認識,其實記一個基本的形態便可,這是面對龐大英文詞彙仍能處之泰然的原因。


你可能問那麼怎能夠分別它們細微的意思?這也是有一套系統的,只要有多留意身邊英文便會發現加上不同的前綴(prefix)和後綴(suffix)也會有不同意思,例如詞性上,+ness, +ance, +tory, +tion (e.g. administration,管理) 等是名詞;+ous, +ful, +al, +y, +ive (e.g. administrative,管理的) 等是形容詞;+ally +ly (e.g. administratively,管理地) 是副詞;全部建於 administrate (管理) 一字。


需注意的情況:+er, +or 指做那事的人或器材,例如 process 是處理(v.動詞),processor 就是處理器(n.名詞),原來即 CPU!不過注意不要跟比較級的 +er 形容詞混沌,例如 thin (瘦), thinner (較瘦), thinnest (最瘦),那是由動詞開始轉成名詞,比較級則只是形容詞本身的變化。所以要留意 +er 可以是兩者。


以上的只算是基本英文變法,真正的前綴後綴變化多端,任何詞語(通常名詞、形容詞)也可能相配搭使成為一個新字,合成的新字就的意思便會帶著兩者的意思。例如 beauty (美)與 full (充滿)合成 beautiful (滿是美,即美麗的) (奇妙的 wonderful 也是這原理),同樣地,考試有出的 connectionless (缺少連線),是由 connection (連線) 與 full (充滿)的相反 less (缺少) 合成,便是傳輸層 UDP 模式的「無連線」狀態了。對於一些害怕的新字,先不要害怕,若它們只是合成字,其實一拆便解。透過對前後綴的了解,記英文便會事半功倍。


更多其它變化:慢慢見得多終有一天會發現更多變化,例如以下:


  1. +ing, +ed 也未必一定是進行式或過去式的動詞,它們可以是動名詞 (e.g. finding「找尋中」亦可解作名詞「調查結果」),可以是形容詞性質的現在或過去分詞 (e.g. existing「存在中」更常當成形用詞解作「已有的」)。

  2. "to" 後面未必一定跟 be (e.g. look forward to hearing from you soon「期待著你的回覆啊」)。

  3. 英美之別 (e.g. colour vs color, recognise vs recognize, spiralling vs spiraling)。

  4. 解「相反」的前綴也不止得 un+ (e.g. unhappy),還有 de+,dis+,im+,in+,non+...都有近似作用。

  5. 有待您來發掘...~


最後很想引述老師:學語文是無天才的,要靠長時間的浸淫 - 你有否對它產生學習興致,事事追問為何?你有否細察身邊一切事物,因每處都是學習機會?


對語文的熟練是長年累月的,放鬆點不用怕,困難是要逐少解決,不能急功求成,不能坐以待斃,早點開始累積便早點見到成效。


後記


那次是第一次參與電腦證書考試,當時為了幫這位英文較差的同學(同事),每次一起溫習時都很認真準備,當中這文件是重點之一。結果,幫人自己才考得好,所以幫人是有自私原因的 :)

(幸好那同事告訴我最後考獲八百多分;從來不敢告訴他那次考到滿分,也是因他而得的唯一一次。)


歡迎用以下方式儲存或分享本文:


Share


Monday, April 2, 2001

AeroZoom 2.0 Official Download Is Out!

A full introduction hopefully will come soon. For now, enjoy some screen shots (taken from the beta version) and a readme. (Skip to version 2 features) You may download it now on AeroZoom's page.


aerozoom-version-2-beta-interface-a


aerozoom-version-2-beta-interface-b


(Note: This doc aligns poorly in older browsers. Please use new ones.)


[ AeroZoom 2.0a ]

The smooth wheel-zoom, keyboard-free presentation tool


# AeroZoom enhances upon the new smooth-zooming Magnifier in Windows
7 to simulate a presentation mouse, where zooming in/out and
positioning is a breeze without a keyboard.

# Enhances mouse operations of Snipping Tool and ZoomIt too since v2.

[ Main Features ]

# Binding keyboard controls commonly used in presentations to mouse
buttons and 'AeroZoom panel' buttons.

# Zooming in/out or reset any time without using a keyboard; handle
more operations with one hand.

# AeroZoom panel is made of large buttons designed to quickly toggle
sub-magnifier settings or to add more functionality. Upon calling
by mouse buttons, it pops up where the cursor is, without the need
to locate the Magnifier window minimized in taskbar.

[ New Features ]

# Mac OS X zoom -- Achieved with modifier key support: Ctrl, Alt,
Win, Shift. Added more mouse button support: Middle, Back, Forward
and Left, Right. (Lefthanders don't need to run a separate program
anymore.)

# 'Single-finger zoom' -- No need to use 2 buttons to zoom anymore.
Simply zoom by holding and pressing the middle button.

# Powerpointing while zooming live -- Thanks to AeroZoom Pad (aka
Misclick-preventing pad) that prevents sending clicks to apps
behind.

# Sliders -- Slide it to zoom in/out or adjust how deep each scroll
zooms (Or, watch it indicate changes as hotkeys are being used to
zoom.)

# Hold Middle mouse button as trigger -- Do more with a mouse, and
dynamically switching operations between zoomed/unzoomed states.

- While zoomed, quickly preview the whole screen and move to
other areas without zooming out.

- Capture regions of screen for annotation with Snipping Tool --
By holding Middle button and drag. (Like Compiz's Winkey+drag.)

- Optional Sysinternals ZoomIt enhancements -- Access non-live
zoom (aka still zoom), draw, break timer, black/white board,
all without a keyboard.

[ More Features ]

# New Tool menu containing lots of useful accessories, such as:

- Windows Tools: Access common tools right from the menu.

- Run on Startup: e.g. Have the screen color inverted at startup

- Click-n-Go: In old versions, when a panel button is pressed,
AeroZoom Panel hides itself at once for efficiency, but now
this feature is optional to help beginners.

- Always-on-Top: Make panel and tools run from it on the front.

- Advanced Options: Lots of customizations for tweakers, e.g.
define a custom text editor, delay the triggers.

# All Windows Magnifier settings can now be accessed in the panel.

# Specially optimize mouse with a Back/Forward button to do more.
(See '? > Quick Instructions > Extras')

# Supports more keyboard shortcuts (See [Quick Instructions] below)

# Many subtle improvements, e.g. redesigned algorithm to enhance
precision and performance. Magnifier runs in the background at
once after AeroZoom is started. Settings from last time are also
applied automatically.

# Portable and now installable. (See [Special Installation] below.)

# Native 64-bit support.

# As always, free and open source. Written with AutoHotkey.

[ Quick Start ]

# Basically, just run AeroZoom.exe. Try zooming with [Left]+[Wheel-
up/down] mouse buttons, preview full screen by holding [Middle],
reset zoom with [Left]+[Middle]. (The latter are added functions
which the original Magnifier does not offer.) Then, when more
functions are needed, call the AeroZoom panel with [Left]+[Right]
buttons.

[ Quick Instructions ]

# AeroZoom binds common keyboard controls to these mouse buttons
and keys.

- Keyboard Shortcuts -

Full Screen => [Ctrl] + [Alt] + [F]
Lens => [Ctrl] + [Alt] + [L]
Docked => [Ctrl] + [Alt] + [D]
Preview full screen => [Ctrl] + [Alt] + [Space]

Zoom level => [Win] + [Alt] + [F1 to F6]
Invert color => [Win] + [Alt] + [I]
Follow mouse => [Win] + [Alt] + [M]
Follow key => [Win] + [Alt] + [K]
Follow text => [Win] + [Alt] + [T]

Reset zoom => [Win] + [Shift] + [-]
Reset magnifier => [Win] + [Alt] + [R]
Show|hide magnifier => [Win] + [Shift] + [`]
Show|hide panel => [Win] + [Shift] + [Esc]
New snip => [Win] + [Alt] + [S]
Turn off|on hotkeys => [Win] + [Alt] + [O]

- Modifier (User-defined Mouse Button/Key) -

Zoom in => hold [Modifier] + [Wheel-up]
Zoom out => hold [Modifier] + [Wheel-down]
Reset zoom => [Modifier] + [Middle]
Show|hide panel => [Left] + [Right]
Preview full screen => hold [Middle] *when zoomed
New snip => hold [Middle] **when zoomed out
Still zoom on|off => hold [Middle] **requires ZoomIt


Note: In Middle button mode, hold [Middle] + [Right] to reset
zoom, [Middle] + [Left] to snip/still-zoom/preview.

In Back/Forward mode, more hotkeys are supported for use
use of unused buttons, see 'Quick Instructions > Extras'

[ Special Installation ]

# AeroZoom by default installs into Local App Data, To install to
All Users or perform unattended installation, see Setup.exe /?

[ Usage and Tips ]

# There's a lot I want to tell you, so I did a Startup Tips feature
in AeroZoom 2.0. Also, see this page for a walkthrough and video:

wandersick.blogspot.com/p/aerozoom-for-windows-7-magnifier.html

[ System Requirements ]

1. Windows 7 Home Basic/Home Premium/Professional/Ultimate/Enterp.

2. Aero (theme) is required. Windows 7 Starter does not support
Aero at all, so it cannot use Lens and Full Screen views.

3. AeroZoom needs administrator rights to run. If non-admin, it
elevates itself. (Note: However, the Installation is per-user
and does not require admin rights). 'Run on Startup' and some
parts don't fully support standard user accounts (even after
elevation).

4. For Sysinternals ZoomIt enhancements, please download zoomit
.exe and put it into 'AeroZoom\Data' folder.

[ Limitations ]

# If you've encountered any bugs or any of the following and
think it is a bug. Please leave a message via the link above
to let Wandersick know.

1. Sometimes, the 1st click (holding [Middle] button) for still
zoom (of Sysinternals ZoomIt) has no effect. The 2nd time does.

2. In middle button modifier, scrolling too 'awkwardly' may cause
duplication ('ghost frames') of misclick-preventing pad.

3. Zoom Pad may be inaccurate for some types of window. You may
try fine-tuning offset settings in 'Tool > Advanced Options'.

4. Zooming may be jerky when both misclick-preventing pad and
'follow keyboard' are on. ('Follow text' is OK though.)

5. Turning ZoomIt on and off frequenly may leave lots of phantom
tray icons.

6. In unknown situations, the pad suddenly turns untransparent.

7. The Magnification slider gets jerky or does not work. Try to
avoid using keyboard hotkeys and see if it improves.

8. Tip for ZoomIt's Zoom/Draw/Timer. While a ZoomIt window is
activated, do NOT press [Alt + F4] to leave; otherwise ZoomIt
.exe might hang without ending the process, leaving a phantom
ZoomIt.exe that causes problems. Instead, press [Esc] or right
click or press [Timer] on the panel to leave.

9. 'Run on Startup' fails to automatically run magnifier at
startup if there are UAC prompts caused by other programs
during boot.

10. After using AeroZoom, Magnifier cannot be launched separately.
Solution: At 'Tool > Advanced Options', change 'Magnifier' to
Min/Show.

11. Pressing buttons on the AeroZoom panel has no effect at times?
You may have to set 'Button delay' in 'Tool > Advanced Options'
to a higher value for your system. (Some tweaking is required.)

[ Releases ]

v1.0 Private release
v1.5 Added [Calc], [Draw] and [Type] buttons
v1.6 First public release.
Added [Off] button to temporarily disable mouse hotkeys.
v1.7 Fixed a nasty bug that seriously affect usability and
beauty when run with UAC on. Sorry for any inconvenience.
Significantly improved performance during operations.
Fixed keyboard alt texts of help menu and [hide] button.
v1.9 Private release
v2.0 Big release with a complete redesign. See top of this doc.
Some fixed bugs are listed here:
- After pressing [Kill] or externally closing Magnifier,
[Invert Color] needed to be pressed 2 times.
- Ease Of Access Center pop-ups on first zoom.
- Titles matching don't work in non-English systems
- Changes aren't reflected on AeroZoom at once after
changing settings in Windows Magnifier.
- Tray icon doesn't bring up AeroZoom Panel.
v2.0a ZoomIt Enhancements Setup and subtle improvements
Fixed bug of original keyboard zoom hotkeys

[ Credits / Attributions ]

# Icon by Oliver Scholtz - www.iconfinder.com/browse/iconset/humano2

# Many thanks to everyone who gave me suggestions that made what
AeroZoom is today.

[ Suggestions ]

# Do you have one? Please drop me a line at wandersick@gmail.com, or:


(c) 2010-11 Wandersick | http://wandersick.blogspot.com


You may bookmark or share this article using the following:


Share

Share/Bookmark

Thursday, March 29, 2001

10 Tips for Utilizing Scratchpad of Google Chrome

(閱讀中文版)


As mentioned in the last post "Google Chrome's Scratchpad — the Revolutionary Notepad", this sequel will cover 10 personal Scratchpad tips I find really useful. They answer questions many Scratchpad users ask, such as making Scratchpad always on top, saving notes as local files or better printing, searching all notes from Chrome's omnibar or Start Menu, etc. To emphasize the fact that Scratchpad supports multiple platforms, besides Windows, there will also be demonstration using Ubuntu. Let's go!


1. Run Scratchpad from Bookmarks Bar


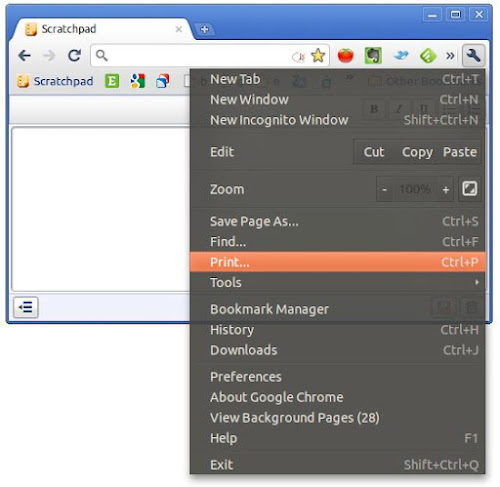
Sometimes it's handy to run Scratchpad from Bookmarks Bar rather than launching it from the app screen (which requires one more step). That way we can also experience a new way of using the app — a bigger screen and 'panel-less effect' (for Chrome OS). Most important, the Chrome menu is accessible:


2-bookmarks-bar-access-chrome-menu-scratchpad


Scratchpad run this way can access print, zoom, etc. by clicking the wrench icon.)


All that is needed is to add a bookmark containing this URL:


chrome-extension://kjebfhglflhjjjiceimfkgicifkhjlnm/html/view.html


Update: Since April 2012, the link has been changed to


chrome-extension://kjebfhglflhjjjiceimfkgicifkhjlnm/index.html


(The long string is the program ID of Scratchpad in the Chrome Web Store.)


If the Chrome version is too not old, we can also access Scratchpad this way on the New Tab page by middle-clicking the Scratchpad icon (or Ctrl + Left click).


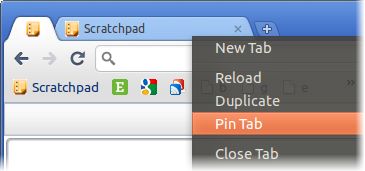
Side-note: If you like this tip or want to start it automatically with Chrome, you may also like to have it pinned. (Less tab space is consumed this way.)


2-pinned-scratchpad


2. Keyboard shortcuts — Explore Unpublished Capabilities


Since Scratchpad is actually Chrome underneath, the same useful functions still work, even if it has not provided any menu/button to choose them. Let's take a look:


  1. Full screen: Press F11 to have a distraction-free full screen editing environment. Press it once again to return.


  2. New note: Press F5 to begin a new note. (Strange but good side effect of the refresh button.) Not suitable since version 3.


  3. Zoom: Ctrl+[+ or -] or Ctrl+Wheel[Up or Down] to zoom in/out. Ctrl+0 for restoring to normal.


  4. Paste: hit Ctrl+Shift+V to paste without formatting; Ctrl+V to paste with formatting. (Only works with texts copied from Chrome.)


  5. Search: Ctrl+F to use the elegant built-in search of Chrome to search inside each note or note titles. Found positions are automatically highlighted in the vertical scroll bar.


  6. Print: Ctrl+P to print. Unfortunately, the output is kind of like one that's made with the print screen button. (For a better local printing method, check out tip #7, or use the web version of Google Docs to print.) For longer notes, the end could get clipped, and worse, output looks different when printed from different operating systems:


1-ctrl-p-print-scratchpad


Side-note: For other basic text editing shortcuts such as bold/italic/underline, please refer to this official Scratchpad support document instead.


3. Holy Chrome! I Only Want a Note-taking App, Not Chrome


(You may find this one familiar if you've read the last article. Technique #3 and #4 are the prerequisites for the introduction of technique #5, because many tips were born after this convenient Chrome feature.)


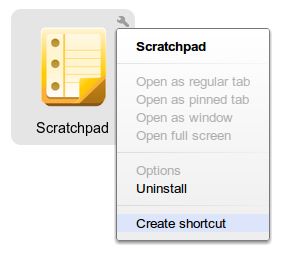
Heard this is a Chrome app and became uninterested? You don't have to be a Chrome fan to use Scratchpad; you can still use your favorite Firefox/Safari/Opera/IE to browse the Internet, because Scratchpad can be used outside Google Chrome just like a traditional desktop app. Thanks to Google Chrome 9 (or newer) which offers the option to create shortcuts on Desktop, Application Menu and Quick Launch, making the details of a web app totally transparent to users.


Create Shortcuts for Scratchpad


On the New Tab page, click the wrench on the app icon and select 'Create shortcut'.


4. Even Faster Startup with Customized Hotkeys


Although Scratchpad starts up so quickly already, wouldn't it be great if it can be called by pressing some combination of keys? That way the need of jotting down new ideas wouldn't be frustrated by the need of locating the application.


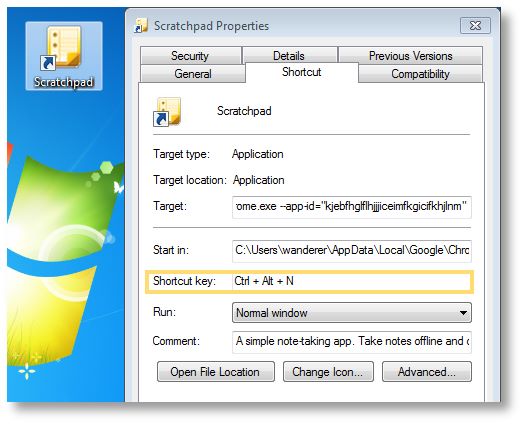
Windows Method: Go to Start Menu/Desktop and right-click on the app shortcut created with the previous tip, select Properties. At Shortcut Keys, press the hotkey combination, e.g. Ctrl+Alt+N. Click OK to save.


4-windows-launch-by-keyboard-shortcut


As seen in the shortcut properties above. Scratchpad describes itself as: "A simple note-taking app. Take notes offline and optionally sync to the cloud when you're online."


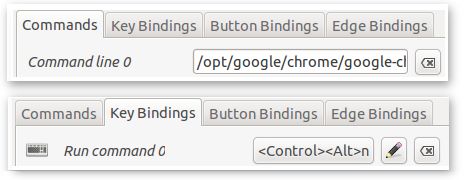
Ubuntu equivalent: Go to CompizConfig Settings Manager > General > Commands


There, pick one of the 'Command line' and set it as the following:


/opt/google/chrome/google-chrome --app-id="kjebfhglflhjjjiceimfkgicifkhjlnm"


Then at Key Binding tab, set the corresponding Run command to Ctrl+Alt+N or any other hotkey you like.


4-linux-compiz-keyboard-shortcuts


This example assumes Google Chrome. If you use Chromium, change the path to /usr/bin/chromium-browser. Please accommodate it to your needs.


Now that with the Hotkey set, it is very easy to run more than 1 instance of the app to compare and edit different notes at the same time using AeroSnap (Windows) or the Grid plug-in for Compiz (Linux) to cut Scratchpad windows into specific sizes and move them to new locations.


5. Always on Top Windows — Chrome OS Panels


5-chrome-os-panels


Panel is a component of Chrome OS which eases multi-tasking. (Image source: The Chromium Project)


Chrome OS has a neat design called Panels which are windows (of apps such as note-taking, music playback controls, chat) that are always in front of other windows. However, Google only leaves this feature for Chrome OS devices. What about us Chrome browser users? Yes we can! (with any of the following tools.)


Method 1: VirtuaWin


Method one is simpler to set up, while method two is more handy but more advanced.


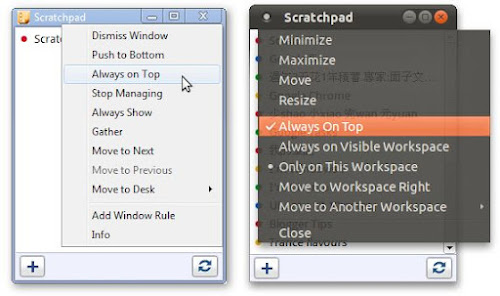
VirtuaWin is a useful Virtual Desktop app for Windows, but today we're only going to use one of its side-features — setting windows always on top. After downloading and installing it, middle-click the title bar of any app (e.g. Scratchpad) and select "Always on Top" as the below picture.


Ubuntu Equivalent


Ubuntu users can quickly change the "Always on Top" status of any window with keyboard shortcut: Alt+Space then T, or by right-clicking the title bar and select "Always on Top".


5-virtuawin-windows-compiz-linux-always-on-top.png


For Windows users (left picture), middle-click shows the appmenu (of VirtuaWin); for Ubuntu users (right picture), right-click or Alt+Space shows the appmenu (a built-in function of the OS).


Method 2: AutoHotkey


While the above method requires extra mouse/keyboard operations, this one doesn't require them at all. Just boot up the PC then launch Scratchpad using hotkey Ctrl+Alt+N. By the time Scratchpad arrives, it's already always on top! And there's a bonus feature: we can toggle the "Always on Top" status of any window by pressing Alt+Shift+T. To achieve this, simply download this compiled AutoHotkey executable and put it in the 'Startup' folder (which can be accessed by pressing WinKey+R and typing 'shell:startup' in the Run prompt.)


AutoHotkey users may customize this .ahk script to suit your needs, such as changing the hotkey combination (marked in red):


; Always-on-Top Panels for Scratchpad (Google Chrome)
; AutoHotkey script by wandersick 8-Feb-2011 [Revised on 7-Apr]
;
; goals
; 1. ctrl+alt+n to launch scratchpad
; 2. automatically always on top (like panels in ChromeOS)
; 3. alt+shift+t to toggle always on top status in any window
;
; supports:
; - Windows from XP to 7 (by junction)
; - enterprise and regular installation of Chrome
; - multiple instances but the latter run instances will only
; be set to always-on-top when the currently active
; (topmost) window is not a last instance of scratchpad
;
; before this will work, ensure appropiate version of Chrome
; and Scratchpad are installed and account sync is enabled.

Chrome=Google\Chrome\Application\chrome.exe

IfExist,%programFiles%\%Chrome%
Browser=%programFiles%\%Chrome%

IfExist,%userProfile%\Local Settings\Application Data\%Chrome%
Browser=%userProfile%\Local Settings\Application Data\%Chrome%

^!n::
Run, "%Browser%" --app-id="kjebfhglflhjjjiceimfkgicifkhjlnm"
WinWaitActive,Scratchpad
WinSet, AlwaysOnTop, On, A
Return

+!t::Winset, AlwaysOnTop, Toggle, A


Linux equivalent: Go to CompizConfig Settings Manager > Windows Management > Windows Rules:


5-compiz-window-rules-above-always-on-top-scratchpad


Under 'Matches' tab, 'Above' row, enter: title=^Scratchpad$


This is it! Linux rocks. ;)


5-jot-notes-reading-ebooks-scratchpad


After making Scratchpad always on top, note-taking becomes a breeze while reading ebooks/web pages in another app.


6. As an Offline-capable Alternative to Google Tasks


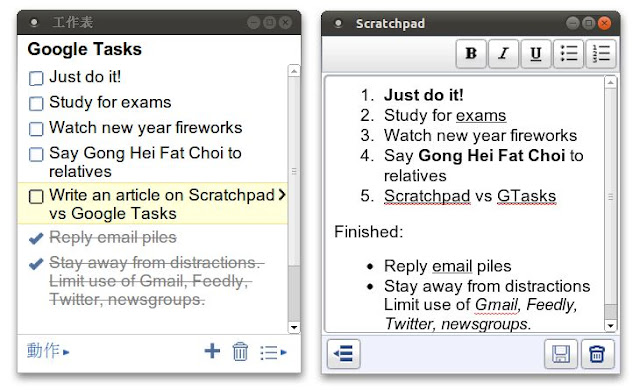
Google Tasks, the handy task management tool built into Gmail and Google Calandar as well as being a standalone application, however until now is still only usable online. (Note: Except iOS where a third-party app 'GeeTasks' can solve the problem). If you don't find the integration between Google services useful, why not use Scratchpad for offline tasks instead?


6-google-tasks-vs-scratchpad


Using Scratchpad as a task management tool also has other advantages, such as Revision History (to see what happened last week, for example), text formatting (although strike-through formatting is not available). Both Scratchpad and Google Tasks offer a menu to choose tasks/notes from.


7. Access Notes Locally as .Doc Files


Despite being an advanced HTML5 web app with offline capability, other than copy-and-paste, Scratchpad unfortunately isn't capable of saving or exporting documents locally. Not to mention there's no way to locally print a note more properly than the method in tip #2. To work around this, we can use Gladinet Cloud Desktop to map Google Docs storage as a local drive in My Computer. (Think of the action as plugging in a giant USB flash disk from the Internet). Notes would then be accessible.



7-gladinet-scratchpad-local-access


Scratchpad notes become .docs files in Gladinet. The archived notes (i.e. notes deleted from Scratchpad) are displayed there as well. However, be careful that use in this way may screw up some notes, e.g. creating dupes, as shown on the right.


Ubuntu equivalent?


Bad News: Gladinet is Windows-only at this moment. Mac users however could use a paid solution, Syncplicity, to achieve similar results, but there's no way to do it on Linux as of now. Good news: Dropbox, the most popular file hosting service, has recently announced in a blog post this feature is being developed. When they roll it out, it will be convenient to many people out there using Dropbox to sync files between the cloud and local computers. Ubuntu and Mac users are benefited because Dropbox is available for those platforms.


(Update: Besides the upcoming Google Drive, now there is one more choice for a Dropbox-like Google Docs client - Insync. Insync supports Windows and Mac OS, while Linux support is coming soon. And it's great to know that such good app is free!)


8. Open Documents Already in Google Docs


Sometimes we might wish Scratchpad could use a document in Google Docs, but it sees nothing other than its own notes, as it is designed to only see things in the 'Scratchpad' folder in Google Docs. Wait a minute. Doesn't that also mean we might be able to turn other documents into Scratchpad notes simply by labelling them 'Scratchpad' or moving them to the Scratchpad folder? (Either in Google Docs or Gladinet.) Yes! It works for simple documents. Don't be tempted to try documents too complex though. Scratchpad isn't designed to handle them!


8-open-snippy-clips-in-scratchpad


In this example, a note clipped using Snippy (Left), a third-party Google Chrome extension that clips web items as Google Docs documents, has been transferred to Scatchpad and opened fine (Right).


9. Revert to Previous Edits with Revision History


Traditionally, before we edit/make changes to a file, it is suggested to back it up first (e.g. saving as a new file with another name) in case things might go wrong later. But with Revision History support of Google Docs there are fewer reasons of doing so now. Google Docs keeps track of changes made to an document and create a backup copy for each version. Although there's no way to access revisions through Scratchpad's interface, it doesn't mean 'restore points' aren't created. (Otherwise Scratchpad wouldn't be so confident not to provide a single 'Save As' button for us!).


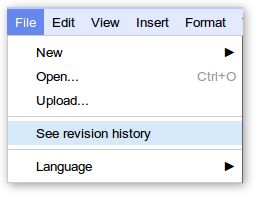
9-google-docs-revision-history-2


Revision History on Google Docs web site.


Normally we can access revision history right from the main menu in Google Docs, but the option is gone for notes located in Scratchpad folder. It seems Google may not intend Scratchpad to have this feature? Fortunately, Revision History still can be accessed in the editing mode after any note is opened:


9-google-docs-revision-history-1


10. Search Note Content More Conveniently


As the number of note files grows, sometimes we don't remember where some particular information is. We need content searching across notes (which Ctrl+F does not do).


10-search-google-docs


Deep content searching can only be performed on Scratchpad's backend: Google Docs.

(Update: The new version of Scratchpad already has a search filter feature, but the method below has a different use.)


Instead of visiting docs.google.com and perform searches there every single time, we'll demonstrate how to search more efficiently from these common locations:


10-search-google-docs-content


They are: Chrome's Omnibar, Run, Start Menu and Command Prompt (Windows and Ubuntu).


I will demonstrate a way to search all Google Docs documents first, then a way to only search Scratchpad notes.


Windows Method (Start Menu/Run/Command Prompt): Open a notepad. Input the below. Save the file as "docs.bat" (with the double quotes) in your %WinDir% (normally C:\Windows).


@echo off


start "" "https://docs.google.com/?tab=mo&pli=1#search/%*"


Linux Equivalent (Run Application/Terminal): Open a text editor. Input the below. Save the file as doc (in lower-case). Put it in /bin. Grant it execute permission (or run this command in Terminal: sudo chmod +x /bin/doc)


#!/bin/sh


x-www-browser "https://docs.google.com/?tab=mo&pli=1#search/$*"


Alternatively, we could also use the smart omnibar of Chrome, to search the notes.


First, right-click on the omnibar and select 'Edit Search Engines'. At 'Other search engines', add the following details:


10-chrome-omnibar-search-google-docs


  • Add a new search engine: docs (or anything)


  • Keyword: docs


  • URL with %s in place of query: https://docs.google.com/?tab=mo&pli=1#search/%s


Now let's try it! Enter 'docs' followed by a 'space' and the search term to start searching right away!


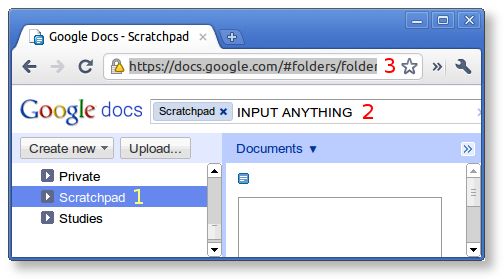
However, searching this way returns results from all Google Docs folders. How to limit the search to Scratchpad folder? The key is in the URL. It needs to include Scratchpad's folder ID:


10-input-anything-google-docs-search


  1. First, click 'Scratchpad' folder on the left


  2. Input anything at the search bar, e.g. "INPUT ANYTHING", then hit "Enter".


  3. Wait until the search is done and copy the new URL. For example, for my computer, it is:


    https://docs.google.com/#advanced-search/q=
    INPUT%20ANYTHING&view=2&parent=folder.0.0BxiWwW3uQiAZccAA9KCSSM


Finally, change "INPUT%20ANYTHING" or anything you inputted to "%s", for example:


https://docs.google.com/#advanced-search/q=
%s&view=2&parent=folder.0.0BxiWwW3uQiAZccAA9KCSSM


Replace the old URL with the new one. Done!


Note: It will not work if you use the above URL; you must create your own because it is differernt for everyone.


Conclusion


So this is the end of my "2-part tribute" to the useful note-taking app: Scratchpad. (First part is here.) I hope you enjoyed Scratchpad as much as I did! Please leave a comment if you have any questions or a tip to share.


You may bookmark or share this article using the following:


Share

Share/Bookmark

Tuesday, February 13, 2001

Google Chrome's Scratchpad - the Revolutionary Notepad

(閱讀中文版)


Do you take notes? If you do, I believe you must have once been on the lookout for a quick and good note-taking app as I were. Now that I've found it, I can't wait to share with you a brilliant notepad - Scratchpad!


Scratchpad


Google Chrome's Scratchpad is what Notepad would be if redesigned from the ground up today. In the old days we might use Notepad because of its speed, despite putting up with its lack of features. We worry about our work being unsaved so our reflex always nervously triggers us to s-s-save it. Also, we want to create copies for backup/reverting changes, so once in a while we have to remind ourself to click the "Save as" button and think up a new file name. Futhermore, we want the document to sync across places so we put it in Dropbox or our USB flash disk to carry with us. And, oh no, we haven't even talked about writing yet! How much productivity is lost in all this? Can't we simply focus on writing itself?


Comes Scratchpad, the revolutionary notepad that solves ALL of this. (Yes, it's true) Scratchpad is a lightweight and fast, free, cross-platform, sync-capable (with Google Docs), note-taking web app with offline capability, spell check and basic formatting support. It fulfills the 3S goals of Google's Chrome browser perfectly - speedy, simple, secure.


Cross-platform Ubuntu and Windows


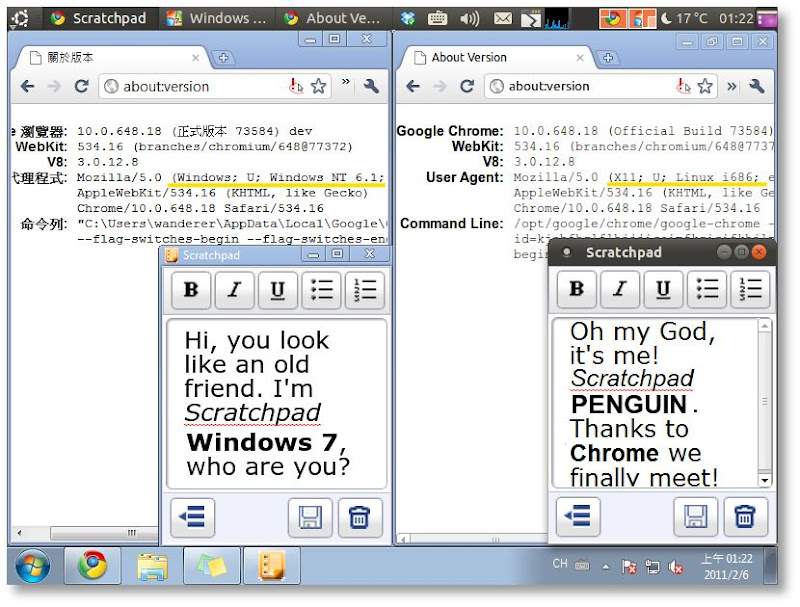
Windows 7 and Ubuntu (hence the 'Penguin'), showcasting the cross-platform capability of Scratchpad (and any Chrome apps).


Speed

  • Quickly jotting down ideas thanks to its Notepad-esque speed and much more powerful features.


Simplicity


  • Traditional tasks like file saving and naming, backing up before revising a document, copying the same file to all computers and keeping it updated, locating file from disk with file explorer, etc, are a past tense.

  • We can finally truly focus on writing, thanks to Scratchpad features such as automatic saving (no dialog appears in front of users), automatic backup (older versions can be reverted in revision history of Google Docs), automatic cloud-syncing (same experience everywhere), and built-in note manager (access or search all notes without an external file explorer).


Security


Connection to Google Docs is encrypted (HTTPS)


  1. Connection to Google Docs server is encrypted. Others cannot decode the message transferred.

  2. Google Chrome implements the sandbox mechanism. Apps are isolated from outside risks such as virus.


Yes, Scratchpad is an official Google Chrome app, integrated in the Chrome OS, available for free on the Chrome Web Store for Chrome browser users. Uninterested now knowing it is for Chrome? Don't be. Even if you may not be a Chrome user, this app will also benefit you. Read on to find out how to run Scratchpad without Chrome.


Installation and Basic Usage


1. Install the Google Chrome browser here. Then install Scratchpad over Chrome Web Store here. You will be asked to logon to Google if you're a first-timer.


Scratchpad on the Chrome Web Store


Scratchpad on the Chrome Web Store. On the right is the 'Install' button.


2. Scratchpad's icon is now shown on the New Tab page. Double click to run it. Click 'Get started'.


Scratchpad on the New Tab page of Google Chrome


Scratchpad on the New Tab page of Google Chrome. Clicking on it takes us to the program on the right.


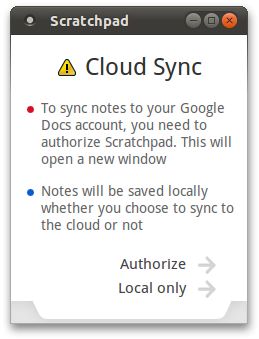
3. Click 'Authorize' if you want to take advantage of bi-directional syncing with Google Docs so that you can access your notes anywhere. You will be asked to grant access to your Google account. Otherwise, click 'Local only', which keeps all notes in the current computer only.


Scratchpad First-run Wizard


Scratchpad first-run wizard. Note there is no way to change this option later besides reinstalling. (Update: In the new Scratchpad this setting can be adjusted in Options.)


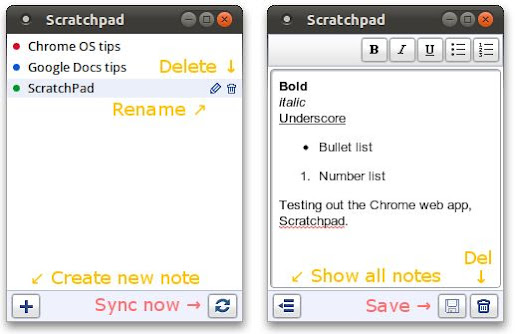
4. Now that Scratchpad is ready for use, this is the work space we will be facing from now on. The interface is very clean and the buttons are very self-explanatory. On the left is the main menu (explorer) where all saved note titles are listed; on the right is the editor. One notable thing is in the highlighted note on the left, where two mini-buttons 'Rename' and 'Delete' are revealed. (There's another 'Delete' button on the right bottom corner of the editor as well).


Scratchpad Menu and Notes


Although there is a 'Sync' button in the menu and a 'Save' button in the editor, the syncing and saving process happens automatically (within a few seconds and 30 seconds respectively) to prevent users from losing any data.


5. When more features are needed, we can always go to Google Docs at http://docs.google.com to access the full editor. Scratchpad notes are placed there in the 'Scratchpad' folder. (In other words, labelled 'Scratchpad'.) After editing, notes will be synced back to Scratchpad.


Scratchpad notes accessed from Google Docs


Notes deleted from Scratchpad are actually archived here as well. Although they appears gone locally, the archived copies are left intact in Google Docs. This behaviour is by design as stated in the official FAQ.


Holy Chrome! I Only Want a Note-taking App, Not Chrome


Heard this is a Chrome app and became uninterested? You don't have to be a Chrome fan to use Scratchpad; you can still use your favorite Firefox/Safari/Opera/Internet Explorer to browse the Internet, because Scratchpad can be used outside Google Chrome just like a traditional desktop app. If you are on the Dev or Beta channel of Google Chrome, you might have already known this function for a while. Finally stable-channel Chrome users can now enjoy it too, thanks to the recently released Google Chrome 9 Stable which offers the option to create shortcuts on Desktop, Application Menu and Quick Launch, making the details of a web app totally transparent to users.


Create Shortcuts for Scratchpad


On the New Tab page, click the wrench icon on the app icon and select 'Create shortcut'.


Conclusion


Scratchpad is the productive kind of app that's used all the time once we've got used to it. Personally, I find Scratchpad runs as quickly as Notepad, has support for basic text formatting, cloud-sync, and most of all, it doesn't require any maintenance, so it's now replaced Notepad and Sticky Notes as my number-one note-taking tool. When more features are needed, I'll open Google Docs for "post-processing". (When Chrome OS gets released later this year, the long-awaited HTML5 offline mode of Google Docs may get released too! Looking forward to that.)


Cloud computing and cross-platform dream are not futuristic or just an enterprise thing anymore, but a reality to really enhance our life. I sincerely recommend Scratchpad as the new-era notepad.


I hope you are as passionate as I am reading about Scratchpad. Before I go, I'd like to share one more tip with you. If you are as easily distracted as I am, try pressing F11 to switch to a distraction-free full screen editing environment. So many times this has made me more focused working with Scratchpad. Give it a try! If you want more tips, please read my next post "10 Tips for Utilizing Scratchpad of Google Chrome".


Special report: The save button in the current version of Scratchpad is not working. (Update: The problem has been fixed) This is a known bug. For now, the only way to save note is the keyboard shortcut Ctrl+S. Waiting a few seconds does it too. (Unless it feels better relying on our own hands!)


Feature Summary


  • As clean-looking and fast as Notepad yet much more powerful.


  • New type of web app with offline capability (HTML5). (It can be considered as a simplified Google Docs editor with offline capability until the true Google Docs offline mode is out)


  • Bi-directional syncing with Google Docs. (Not just exporting like some apps do)


  • Free and cross-platform; notes can be synchronized across Chrome OS, Linux, Mac, Windows


  • Notes are accessible on docs.google.com on any Internet devices


  • Multiple instances possible to compare and edit more notes at the same time


  • Auto program updating (always latest version with new features and bug fixes)


  • Simple text formatting: bold, italic, underline and lists


  • Spell check


  • Built-in menu to access and search all notes. (No need for an external file explorer)


  • Auto saving (every few seconds), auto syncing (every 30 seconds)


  • Secure sandbox technology.


  • Secure encrypted connections to Google servers.


  • Official Google app. (Enough said!)


You may bookmark or share this article using the following:


Share

Share/Bookmark


wander-sick Copyright © 2012 Fast Loading -- Powered by Blogger