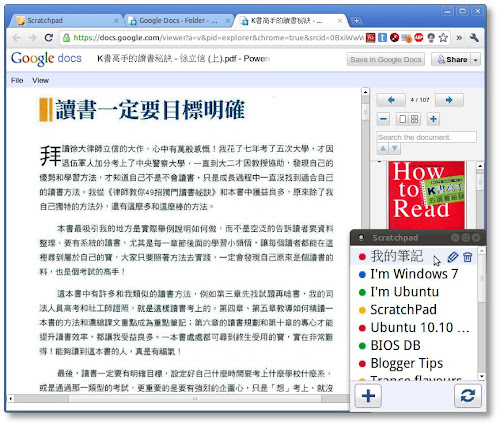
As mentioned in the last post "Google Chrome's Scratchpad — the Revolutionary Notepad", this sequel will cover 10 personal Scratchpad tips I find really useful. They answer questions many Scratchpad users ask, such as making Scratchpad always on top, saving notes as local files or better printing, searching all notes from Chrome's omnibar or Start Menu, etc. To emphasize the fact that Scratchpad supports multiple platforms, besides Windows, there will also be demonstration using Ubuntu. Let's go!
1. Run Scratchpad from Bookmarks Bar
Sometimes it's handy to run Scratchpad from Bookmarks Bar rather than launching it from the app screen (which requires one more step). That way we can also experience a new way of using the app — a bigger screen and 'panel-less effect' (for Chrome OS). Most important, the Chrome menu is accessible:
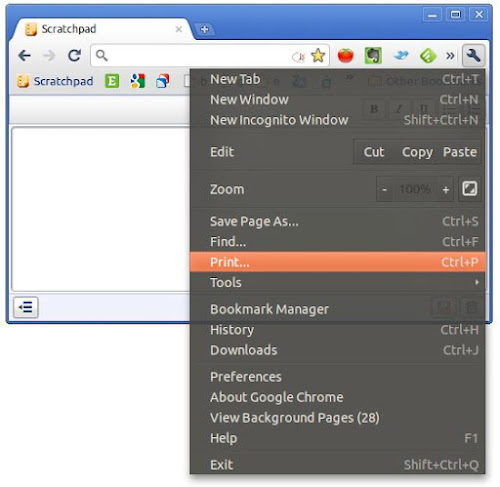
Scratchpad run this way can access print, zoom, etc. by clicking the wrench icon.)
All that is needed is to add a bookmark containing this URL:
chrome-extension://kjebfhglflhjjjiceimfkgicifkhjlnm/html/view.html
Update: Since April 2012, the link has been changed to
chrome-extension://kjebfhglflhjjjiceimfkgicifkhjlnm/index.html
(The long string is the program ID of Scratchpad in the Chrome Web Store.)
If the Chrome version is too not old, we can also access Scratchpad this way on the New Tab page by middle-clicking the Scratchpad icon (or Ctrl + Left click).
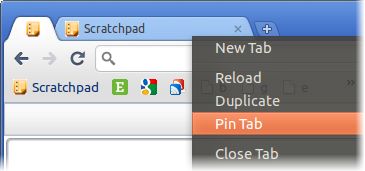
Side-note: If you like this tip or want to start it automatically with Chrome, you may also like to have it pinned. (Less tab space is consumed this way.)
2. Keyboard shortcuts — Explore Unpublished Capabilities
Since Scratchpad is actually Chrome underneath, the same useful functions still work, even if it has not provided any menu/button to choose them. Let's take a look:
Full screen: Press F11 to have a distraction-free full screen editing environment. Press it once again to return.
New note:Press F5 to begin a new note. (Strange but good side effect of the refresh button.)Not suitable since version 3.
Zoom: Ctrl+[+ or -] or Ctrl+Wheel[Up or Down] to zoom in/out. Ctrl+0 for restoring to normal.
Paste: hit Ctrl+Shift+V to paste without formatting; Ctrl+V to paste with formatting. (Only works with texts copied from Chrome.)
Search: Ctrl+F to use the elegant built-in search of Chrome to search inside each note or note titles. Found positions are automatically highlighted in the vertical scroll bar.
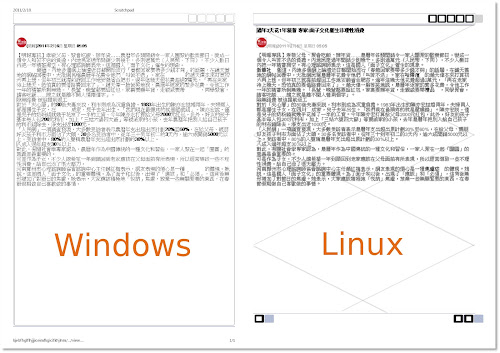
Print: Ctrl+P to print. Unfortunately, the output is kind of like one that's made with the print screen button. (For a better local printing method, check out tip #7, or use the web version of Google Docs to print.) For longer notes, the end could get clipped, and worse, output looks different when printed from different operating systems:
Side-note: For other basic text editing shortcuts such as bold/italic/underline, please refer to this official Scratchpad support document instead.
3. Holy Chrome! I Only Want a Note-taking App, Not Chrome
(You may find this one familiar if you've read the last article. Technique #3 and #4 are the prerequisites for the introduction of technique #5, because many tips were born after this convenient Chrome feature.)
Heard this is a Chrome app and became uninterested? You don't have to be a Chrome fan to use Scratchpad; you can still use your favorite Firefox/Safari/Opera/IE to browse the Internet, because Scratchpad can be used outside Google Chrome just like a traditional desktop app. Thanks to Google Chrome 9 (or newer) which offers the option to create shortcuts on Desktop, Application Menu and Quick Launch, making the details of a web app totally transparent to users.
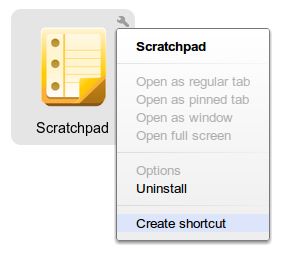
On the New Tab page, click the wrench on the app icon and select 'Create shortcut'.
4. Even Faster Startup with Customized Hotkeys
Although Scratchpad starts up so quickly already, wouldn't it be great if it can be called by pressing some combination of keys? That way the need of jotting down new ideas wouldn't be frustrated by the need of locating the application.
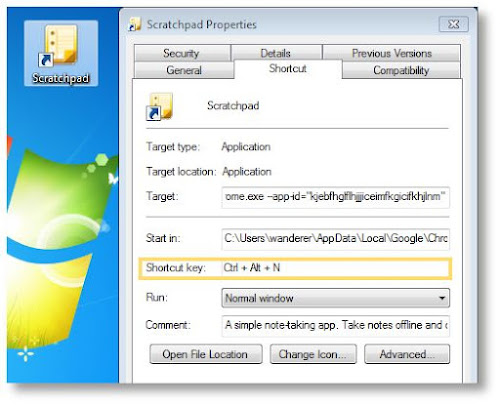
Windows Method: Go to Start Menu/Desktop and right-click on the app shortcut created with the previous tip, select Properties. At Shortcut Keys, press the hotkey combination, e.g. Ctrl+Alt+N. Click OK to save.
As seen in the shortcut properties above. Scratchpad describes itself as: "A simple note-taking app. Take notes offline and optionally sync to the cloud when you're online."
Ubuntu equivalent: Go to CompizConfig Settings Manager > General > Commands
There, pick one of the 'Command line' and set it as the following:
/opt/google/chrome/google-chrome --app-id="kjebfhglflhjjjiceimfkgicifkhjlnm"
Then at Key Binding tab, set the corresponding Run command to Ctrl+Alt+N or any other hotkey you like.
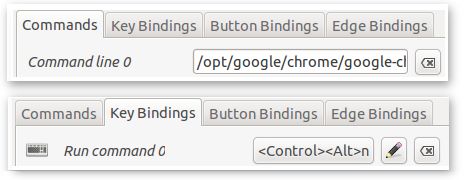
This example assumes Google Chrome. If you use Chromium, change the path to /usr/bin/chromium-browser. Please accommodate it to your needs.
Now that with the Hotkey set, it is very easy to run more than 1 instance of the app to compare and edit different notes at the same time using AeroSnap (Windows) or the Grid plug-in for Compiz (Linux) to cut Scratchpad windows into specific sizes and move them to new locations.
5. Always on Top Windows — Chrome OS Panels
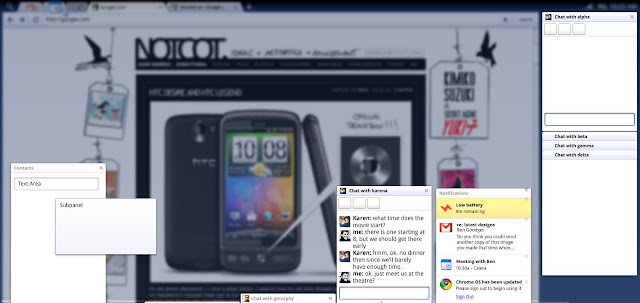
Panel is a component of Chrome OS which eases multi-tasking. (Image source: The Chromium Project)
Chrome OS has a neat design called Panels which are windows (of apps such as note-taking, music playback controls, chat) that are always in front of other windows. However, Google only leaves this feature for Chrome OS devices. What about us Chrome browser users? Yes we can! (with any of the following tools.)
Method 1: VirtuaWin
Method one is simpler to set up, while method two is more handy but more advanced.
VirtuaWin is a useful Virtual Desktop app for Windows, but today we're only going to use one of its side-features — setting windows always on top. After downloading and installing it, middle-click the title bar of any app (e.g. Scratchpad) and select "Always on Top" as the below picture.
Ubuntu Equivalent
Ubuntu users can quickly change the "Always on Top" status of any window with keyboard shortcut: Alt+Space then T, or by right-clicking the title bar and select "Always on Top".
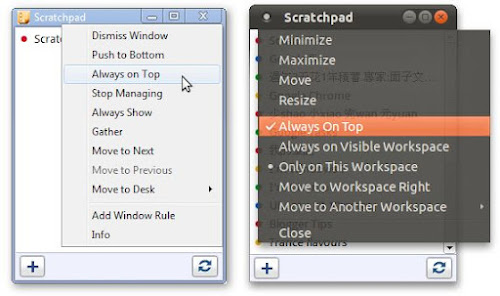
For Windows users (left picture), middle-click shows the appmenu (of VirtuaWin); for Ubuntu users (right picture), right-click or Alt+Space shows the appmenu (a built-in function of the OS).
Method 2: AutoHotkey
While the above method requires extra mouse/keyboard operations, this one doesn't require them at all. Just boot up the PC then launch Scratchpad using hotkey Ctrl+Alt+N. By the time Scratchpad arrives, it's already always on top! And there's a bonus feature: we can toggle the "Always on Top" status of any window by pressing Alt+Shift+T. To achieve this, simply download this compiled AutoHotkey executable and put it in the 'Startup' folder (which can be accessed by pressing WinKey+R and typing 'shell:startup' in the Run prompt.)
AutoHotkey users may customize this .ahk script to suit your needs, such as changing the hotkey combination (marked in red):
; Always-on-Top Panels for Scratchpad (Google Chrome)
; AutoHotkey script by wandersick 8-Feb-2011 [Revised on 7-Apr]
;
; goals
; 1. ctrl+alt+n to launch scratchpad
; 2. automatically always on top (like panels in ChromeOS)
; 3. alt+shift+t to toggle always on top status in any window
;
; supports:
; - Windows from XP to 7 (by junction)
; - enterprise and regular installation of Chrome
; - multiple instances but the latter run instances will only
;   be set to always-on-top when the currently active
;   (topmost) window is not a last instance of scratchpad
;
; before this will work, ensure appropiate version of Chrome
; and Scratchpad are installed and account sync is enabled.

Chrome=Google\Chrome\Application\chrome.exe

IfExist,%programFiles%\%Chrome%
Browser=%programFiles%\%Chrome%

IfExist,%userProfile%\Local Settings\Application Data\%Chrome%
Browser=%userProfile%\Local Settings\Application Data\%Chrome%

^!n::
Run, "%Browser%" --app-id="kjebfhglflhjjjiceimfkgicifkhjlnm"
WinWaitActive,Scratchpad
WinSet, AlwaysOnTop, On, A
Return

+!t::Winset, AlwaysOnTop, Toggle, A
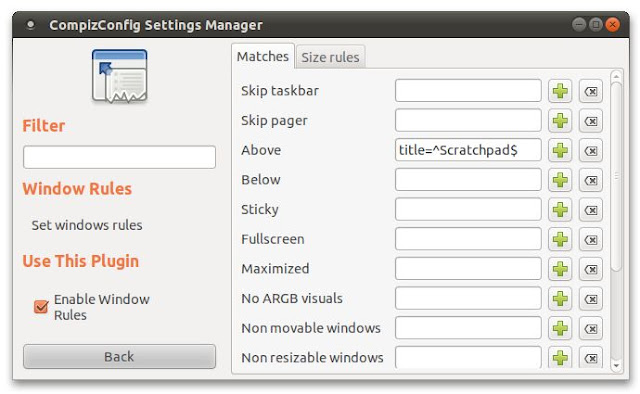
Linux equivalent: Go to CompizConfig Settings Manager > Windows Management > Windows Rules:
Under 'Matches' tab, 'Above' row, enter: title=^Scratchpad$
This is it! Linux rocks. ;)
After making Scratchpad always on top, note-taking becomes a breeze while reading ebooks/web pages in another app.
6. As an Offline-capable Alternative to Google Tasks
Google Tasks, the handy task management tool built into Gmail and Google Calandar as well as being a standalone application, however until now is still only usable online. (Note: Except iOS where a third-party app 'GeeTasks' can solve the problem). If you don't find the integration between Google services useful, why not use Scratchpad for offline tasks instead?
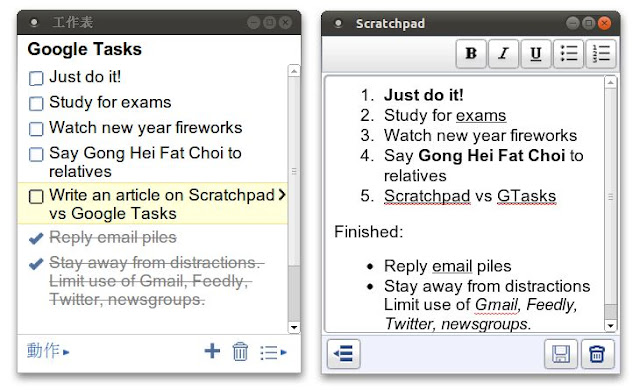
Using Scratchpad as a task management tool also has other advantages, such as Revision History (to see what happened last week, for example), text formatting (although strike-through formatting is not available). Both Scratchpad and Google Tasks offer a menu to choose tasks/notes from.
7. Access Notes Locally as .Doc Files
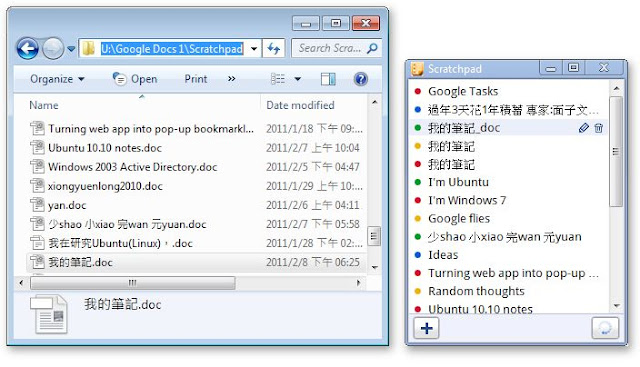
Despite being an advanced HTML5 web app with offline capability, other than copy-and-paste, Scratchpad unfortunately isn't capable of saving or exporting documents locally. Not to mention there's no way to locally print a note more properly than the method in tip #2. To work around this, we can use Gladinet Cloud Desktop to map Google Docs storage as a local drive in My Computer. (Think of the action as plugging in a giant USB flash disk from the Internet). Notes would then be accessible.
Scratchpad notes become .docs files in Gladinet. The archived notes (i.e. notes deleted from Scratchpad) are displayed there as well. However, be careful that use in this way may screw up some notes, e.g. creating dupes, as shown on the right.
Ubuntu equivalent?
Bad News: Gladinet is Windows-only at this moment. Mac users however could use a paid solution, Syncplicity, to achieve similar results, but there's no way to do it on Linux as of now. Good news: Dropbox, the most popular file hosting service, has recently announced in a blog post this feature is being developed. When they roll it out, it will be convenient to many people out there using Dropbox to sync files between the cloud and local computers. Ubuntu and Mac users are benefited because Dropbox is available for those platforms.
(Update: Besides the upcoming Google Drive, now there is one more choice for a Dropbox-like Google Docs client - Insync. Insync supports Windows and Mac OS, while Linux support is coming soon. And it's great to know that such good app is free!)
8. Open Documents Already in Google Docs
Sometimes we might wish Scratchpad could use a document in Google Docs, but it sees nothing other than its own notes, as it is designed to only see things in the 'Scratchpad' folder in Google Docs. Wait a minute. Doesn't that also mean we might be able to turn other documents into Scratchpad notes simply by labelling them 'Scratchpad' or moving them to the Scratchpad folder? (Either in Google Docs or Gladinet.) Yes! It works for simple documents. Don't be tempted to try documents too complex though. Scratchpad isn't designed to handle them!
In this example, a note clipped using Snippy (Left), a third-party Google Chrome extension that clips web items as Google Docs documents, has been transferred to Scatchpad and opened fine (Right).
9. Revert to Previous Edits with Revision History
Traditionally, before we edit/make changes to a file, it is suggested to back it up first (e.g. saving as a new file with another name) in case things might go wrong later. But with Revision History support of Google Docs there are fewer reasons of doing so now. Google Docs keeps track of changes made to an document and create a backup copy for each version. Although there's no way to access revisions through Scratchpad's interface, it doesn't mean 'restore points' aren't created. (Otherwise Scratchpad wouldn't be so confident not to provide a single 'Save As' button for us!).
Revision History on Google Docs web site.
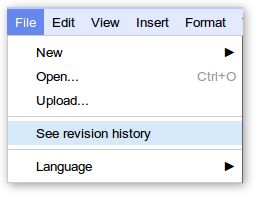
Normally we can access revision history right from the main menu in Google Docs, but the option is gone for notes located in Scratchpad folder. It seems Google may not intend Scratchpad to have this feature? Fortunately, Revision History still can be accessed in the editing mode after any note is opened:
10. Search Note Content More Conveniently
As the number of note files grows, sometimes we don't remember where some particular information is. We need content searching across notes (which Ctrl+F does not do).
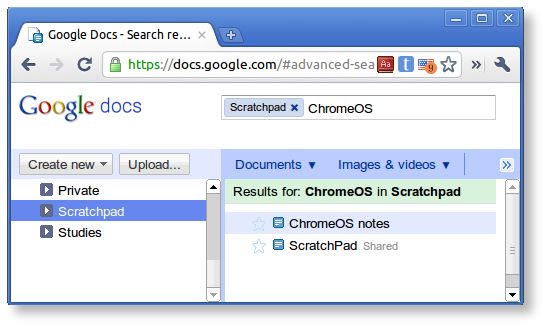
Deep content searching can only be performed on Scratchpad's backend: Google Docs.
(Update: The new version of Scratchpad already has a search filter feature, but the method below has a different use.)
Instead of visiting docs.google.com and perform searches there every single time, we'll demonstrate how to search more efficiently from these common locations:
They are: Chrome's Omnibar, Run, Start Menu and Command Prompt (Windows and Ubuntu).
I will demonstrate a way to search all Google Docs documents first, then a way to only search Scratchpad notes.
Windows Method (Start Menu/Run/Command Prompt): Open a notepad. Input the below. Save the file as "docs.bat" (with the double quotes) in your %WinDir% (normally C:\Windows).
@echo off
start "" "https://docs.google.com/?tab=mo&pli=1#search/%*"
Linux Equivalent (Run Application/Terminal): Open a text editor. Input the below. Save the file as doc (in lower-case). Put it in /bin. Grant it execute permission (or run this command in Terminal: sudo chmod +x /bin/doc)
#!/bin/sh
x-www-browser "https://docs.google.com/?tab=mo&pli=1#search/$*"
Alternatively, we could also use the smart omnibar of Chrome, to search the notes.
First, right-click on the omnibar and select 'Edit Search Engines'. At 'Other search engines', add the following details:

Add a new search engine: docs (or anything)
Keyword: docs
URL with %s in place of query: https://docs.google.com/?tab=mo&pli=1#search/%s
Now let's try it! Enter 'docs' followed by a 'space' and the search term to start searching right away!
However, searching this way returns results from all Google Docs folders. How to limit the search to Scratchpad folder? The key is in the URL. It needs to include Scratchpad's folder ID:
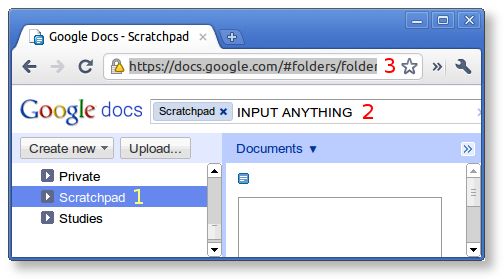
- First, click 'Scratchpad' folder on the left
- Input anything at the search bar, e.g. "INPUT ANYTHING", then hit "Enter".
- Wait until the search is done and copy the new URL. For example, for my computer, it is:
https://docs.google.com/#advanced-search/q=INPUT%20ANYTHING&view=2&parent=folder.0.0BxiWwW3uQiAZccAA9KCSSM
Finally, change "INPUT%20ANYTHING" or anything you inputted to "%s", for example:
https://docs.google.com/#advanced-search/q=%s&view=2&parent=folder.0.0BxiWwW3uQiAZccAA9KCSSM
Replace the old URL with the new one. Done!
Note: It will not work if you use the above URL; you must create your own because it is differernt for everyone.
Conclusion
So this is the end of my "2-part tribute" to the useful note-taking app: Scratchpad. (First part is here.) I hope you enjoyed Scratchpad as much as I did! Please leave a comment if you have any questions or a tip to share.
You may bookmark or share this article using the following:
Share
