Warung Bebas

Monday, April 2, 2001

AeroZoom 2.0 Official Download Is Out!

A full introduction hopefully will come soon. For now, enjoy some screen shots (taken from the beta version) and a readme. (Skip to version 2 features) You may download it now on AeroZoom's page.


aerozoom-version-2-beta-interface-a


aerozoom-version-2-beta-interface-b


(Note: This doc aligns poorly in older browsers. Please use new ones.)


[ AeroZoom 2.0a ]

The smooth wheel-zoom, keyboard-free presentation tool


# AeroZoom enhances upon the new smooth-zooming Magnifier in Windows
7 to simulate a presentation mouse, where zooming in/out and
positioning is a breeze without a keyboard.

# Enhances mouse operations of Snipping Tool and ZoomIt too since v2.

[ Main Features ]

# Binding keyboard controls commonly used in presentations to mouse
buttons and 'AeroZoom panel' buttons.

# Zooming in/out or reset any time without using a keyboard; handle
more operations with one hand.

# AeroZoom panel is made of large buttons designed to quickly toggle
sub-magnifier settings or to add more functionality. Upon calling
by mouse buttons, it pops up where the cursor is, without the need
to locate the Magnifier window minimized in taskbar.

[ New Features ]

# Mac OS X zoom -- Achieved with modifier key support: Ctrl, Alt,
Win, Shift. Added more mouse button support: Middle, Back, Forward
and Left, Right. (Lefthanders don't need to run a separate program
anymore.)

# 'Single-finger zoom' -- No need to use 2 buttons to zoom anymore.
Simply zoom by holding and pressing the middle button.

# Powerpointing while zooming live -- Thanks to AeroZoom Pad (aka
Misclick-preventing pad) that prevents sending clicks to apps
behind.

# Sliders -- Slide it to zoom in/out or adjust how deep each scroll
zooms (Or, watch it indicate changes as hotkeys are being used to
zoom.)

# Hold Middle mouse button as trigger -- Do more with a mouse, and
dynamically switching operations between zoomed/unzoomed states.

- While zoomed, quickly preview the whole screen and move to
other areas without zooming out.

- Capture regions of screen for annotation with Snipping Tool --
By holding Middle button and drag. (Like Compiz's Winkey+drag.)

- Optional Sysinternals ZoomIt enhancements -- Access non-live
zoom (aka still zoom), draw, break timer, black/white board,
all without a keyboard.

[ More Features ]

# New Tool menu containing lots of useful accessories, such as:

- Windows Tools: Access common tools right from the menu.

- Run on Startup: e.g. Have the screen color inverted at startup

- Click-n-Go: In old versions, when a panel button is pressed,
AeroZoom Panel hides itself at once for efficiency, but now
this feature is optional to help beginners.

- Always-on-Top: Make panel and tools run from it on the front.

- Advanced Options: Lots of customizations for tweakers, e.g.
define a custom text editor, delay the triggers.

# All Windows Magnifier settings can now be accessed in the panel.

# Specially optimize mouse with a Back/Forward button to do more.
(See '? > Quick Instructions > Extras')

# Supports more keyboard shortcuts (See [Quick Instructions] below)

# Many subtle improvements, e.g. redesigned algorithm to enhance
precision and performance. Magnifier runs in the background at
once after AeroZoom is started. Settings from last time are also
applied automatically.

# Portable and now installable. (See [Special Installation] below.)

# Native 64-bit support.

# As always, free and open source. Written with AutoHotkey.

[ Quick Start ]

# Basically, just run AeroZoom.exe. Try zooming with [Left]+[Wheel-
up/down] mouse buttons, preview full screen by holding [Middle],
reset zoom with [Left]+[Middle]. (The latter are added functions
which the original Magnifier does not offer.) Then, when more
functions are needed, call the AeroZoom panel with [Left]+[Right]
buttons.

[ Quick Instructions ]

# AeroZoom binds common keyboard controls to these mouse buttons
and keys.

- Keyboard Shortcuts -

Full Screen => [Ctrl] + [Alt] + [F]
Lens => [Ctrl] + [Alt] + [L]
Docked => [Ctrl] + [Alt] + [D]
Preview full screen => [Ctrl] + [Alt] + [Space]

Zoom level => [Win] + [Alt] + [F1 to F6]
Invert color => [Win] + [Alt] + [I]
Follow mouse => [Win] + [Alt] + [M]
Follow key => [Win] + [Alt] + [K]
Follow text => [Win] + [Alt] + [T]

Reset zoom => [Win] + [Shift] + [-]
Reset magnifier => [Win] + [Alt] + [R]
Show|hide magnifier => [Win] + [Shift] + [`]
Show|hide panel => [Win] + [Shift] + [Esc]
New snip => [Win] + [Alt] + [S]
Turn off|on hotkeys => [Win] + [Alt] + [O]

- Modifier (User-defined Mouse Button/Key) -

Zoom in => hold [Modifier] + [Wheel-up]
Zoom out => hold [Modifier] + [Wheel-down]
Reset zoom => [Modifier] + [Middle]
Show|hide panel => [Left] + [Right]
Preview full screen => hold [Middle] *when zoomed
New snip => hold [Middle] **when zoomed out
Still zoom on|off => hold [Middle] **requires ZoomIt


Note: In Middle button mode, hold [Middle] + [Right] to reset
zoom, [Middle] + [Left] to snip/still-zoom/preview.

In Back/Forward mode, more hotkeys are supported for use
use of unused buttons, see 'Quick Instructions > Extras'

[ Special Installation ]

# AeroZoom by default installs into Local App Data, To install to
All Users or perform unattended installation, see Setup.exe /?

[ Usage and Tips ]

# There's a lot I want to tell you, so I did a Startup Tips feature
in AeroZoom 2.0. Also, see this page for a walkthrough and video:

wandersick.blogspot.com/p/aerozoom-for-windows-7-magnifier.html

[ System Requirements ]

1. Windows 7 Home Basic/Home Premium/Professional/Ultimate/Enterp.

2. Aero (theme) is required. Windows 7 Starter does not support
Aero at all, so it cannot use Lens and Full Screen views.

3. AeroZoom needs administrator rights to run. If non-admin, it
elevates itself. (Note: However, the Installation is per-user
and does not require admin rights). 'Run on Startup' and some
parts don't fully support standard user accounts (even after
elevation).

4. For Sysinternals ZoomIt enhancements, please download zoomit
.exe and put it into 'AeroZoom\Data' folder.

[ Limitations ]

# If you've encountered any bugs or any of the following and
think it is a bug. Please leave a message via the link above
to let Wandersick know.

1. Sometimes, the 1st click (holding [Middle] button) for still
zoom (of Sysinternals ZoomIt) has no effect. The 2nd time does.

2. In middle button modifier, scrolling too 'awkwardly' may cause
duplication ('ghost frames') of misclick-preventing pad.

3. Zoom Pad may be inaccurate for some types of window. You may
try fine-tuning offset settings in 'Tool > Advanced Options'.

4. Zooming may be jerky when both misclick-preventing pad and
'follow keyboard' are on. ('Follow text' is OK though.)

5. Turning ZoomIt on and off frequenly may leave lots of phantom
tray icons.

6. In unknown situations, the pad suddenly turns untransparent.

7. The Magnification slider gets jerky or does not work. Try to
avoid using keyboard hotkeys and see if it improves.

8. Tip for ZoomIt's Zoom/Draw/Timer. While a ZoomIt window is
activated, do NOT press [Alt + F4] to leave; otherwise ZoomIt
.exe might hang without ending the process, leaving a phantom
ZoomIt.exe that causes problems. Instead, press [Esc] or right
click or press [Timer] on the panel to leave.

9. 'Run on Startup' fails to automatically run magnifier at
startup if there are UAC prompts caused by other programs
during boot.

10. After using AeroZoom, Magnifier cannot be launched separately.
Solution: At 'Tool > Advanced Options', change 'Magnifier' to
Min/Show.

11. Pressing buttons on the AeroZoom panel has no effect at times?
You may have to set 'Button delay' in 'Tool > Advanced Options'
to a higher value for your system. (Some tweaking is required.)

[ Releases ]

v1.0 Private release
v1.5 Added [Calc], [Draw] and [Type] buttons
v1.6 First public release.
Added [Off] button to temporarily disable mouse hotkeys.
v1.7 Fixed a nasty bug that seriously affect usability and
beauty when run with UAC on. Sorry for any inconvenience.
Significantly improved performance during operations.
Fixed keyboard alt texts of help menu and [hide] button.
v1.9 Private release
v2.0 Big release with a complete redesign. See top of this doc.
Some fixed bugs are listed here:
- After pressing [Kill] or externally closing Magnifier,
[Invert Color] needed to be pressed 2 times.
- Ease Of Access Center pop-ups on first zoom.
- Titles matching don't work in non-English systems
- Changes aren't reflected on AeroZoom at once after
changing settings in Windows Magnifier.
- Tray icon doesn't bring up AeroZoom Panel.
v2.0a ZoomIt Enhancements Setup and subtle improvements
Fixed bug of original keyboard zoom hotkeys

[ Credits / Attributions ]

# Icon by Oliver Scholtz - www.iconfinder.com/browse/iconset/humano2

# Many thanks to everyone who gave me suggestions that made what
AeroZoom is today.

[ Suggestions ]

# Do you have one? Please drop me a line at wandersick@gmail.com, or:


(c) 2010-11 Wandersick | http://wandersick.blogspot.com


You may bookmark or share this article using the following:


Share

Share/Bookmark

Thursday, March 29, 2001

10 Tips for Utilizing Scratchpad of Google Chrome

(閱讀中文版)


As mentioned in the last post "Google Chrome's Scratchpad — the Revolutionary Notepad", this sequel will cover 10 personal Scratchpad tips I find really useful. They answer questions many Scratchpad users ask, such as making Scratchpad always on top, saving notes as local files or better printing, searching all notes from Chrome's omnibar or Start Menu, etc. To emphasize the fact that Scratchpad supports multiple platforms, besides Windows, there will also be demonstration using Ubuntu. Let's go!


1. Run Scratchpad from Bookmarks Bar


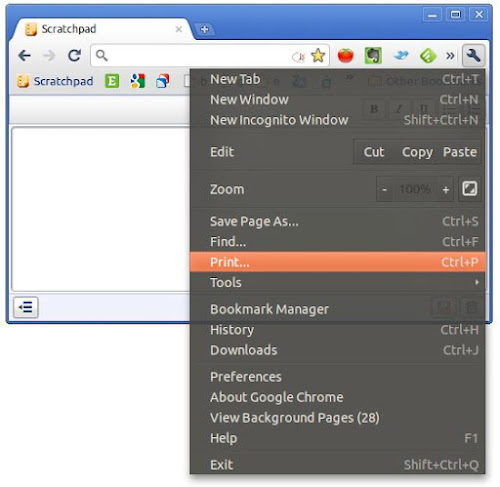
Sometimes it's handy to run Scratchpad from Bookmarks Bar rather than launching it from the app screen (which requires one more step). That way we can also experience a new way of using the app — a bigger screen and 'panel-less effect' (for Chrome OS). Most important, the Chrome menu is accessible:


2-bookmarks-bar-access-chrome-menu-scratchpad


Scratchpad run this way can access print, zoom, etc. by clicking the wrench icon.)


All that is needed is to add a bookmark containing this URL:


chrome-extension://kjebfhglflhjjjiceimfkgicifkhjlnm/html/view.html


Update: Since April 2012, the link has been changed to


chrome-extension://kjebfhglflhjjjiceimfkgicifkhjlnm/index.html


(The long string is the program ID of Scratchpad in the Chrome Web Store.)


If the Chrome version is too not old, we can also access Scratchpad this way on the New Tab page by middle-clicking the Scratchpad icon (or Ctrl + Left click).


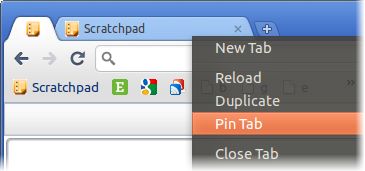
Side-note: If you like this tip or want to start it automatically with Chrome, you may also like to have it pinned. (Less tab space is consumed this way.)


2-pinned-scratchpad


2. Keyboard shortcuts — Explore Unpublished Capabilities


Since Scratchpad is actually Chrome underneath, the same useful functions still work, even if it has not provided any menu/button to choose them. Let's take a look:


  1. Full screen: Press F11 to have a distraction-free full screen editing environment. Press it once again to return.


  2. New note: Press F5 to begin a new note. (Strange but good side effect of the refresh button.) Not suitable since version 3.


  3. Zoom: Ctrl+[+ or -] or Ctrl+Wheel[Up or Down] to zoom in/out. Ctrl+0 for restoring to normal.


  4. Paste: hit Ctrl+Shift+V to paste without formatting; Ctrl+V to paste with formatting. (Only works with texts copied from Chrome.)


  5. Search: Ctrl+F to use the elegant built-in search of Chrome to search inside each note or note titles. Found positions are automatically highlighted in the vertical scroll bar.


  6. Print: Ctrl+P to print. Unfortunately, the output is kind of like one that's made with the print screen button. (For a better local printing method, check out tip #7, or use the web version of Google Docs to print.) For longer notes, the end could get clipped, and worse, output looks different when printed from different operating systems:


1-ctrl-p-print-scratchpad


Side-note: For other basic text editing shortcuts such as bold/italic/underline, please refer to this official Scratchpad support document instead.


3. Holy Chrome! I Only Want a Note-taking App, Not Chrome


(You may find this one familiar if you've read the last article. Technique #3 and #4 are the prerequisites for the introduction of technique #5, because many tips were born after this convenient Chrome feature.)


Heard this is a Chrome app and became uninterested? You don't have to be a Chrome fan to use Scratchpad; you can still use your favorite Firefox/Safari/Opera/IE to browse the Internet, because Scratchpad can be used outside Google Chrome just like a traditional desktop app. Thanks to Google Chrome 9 (or newer) which offers the option to create shortcuts on Desktop, Application Menu and Quick Launch, making the details of a web app totally transparent to users.


Create Shortcuts for Scratchpad


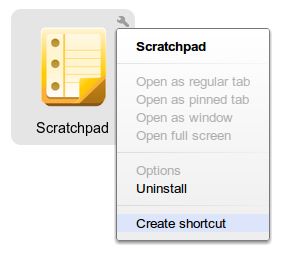
On the New Tab page, click the wrench on the app icon and select 'Create shortcut'.


4. Even Faster Startup with Customized Hotkeys


Although Scratchpad starts up so quickly already, wouldn't it be great if it can be called by pressing some combination of keys? That way the need of jotting down new ideas wouldn't be frustrated by the need of locating the application.


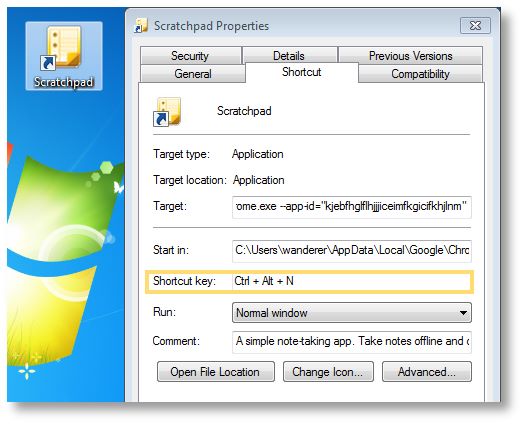
Windows Method: Go to Start Menu/Desktop and right-click on the app shortcut created with the previous tip, select Properties. At Shortcut Keys, press the hotkey combination, e.g. Ctrl+Alt+N. Click OK to save.


4-windows-launch-by-keyboard-shortcut


As seen in the shortcut properties above. Scratchpad describes itself as: "A simple note-taking app. Take notes offline and optionally sync to the cloud when you're online."


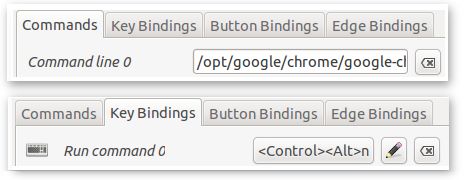
Ubuntu equivalent: Go to CompizConfig Settings Manager > General > Commands


There, pick one of the 'Command line' and set it as the following:


/opt/google/chrome/google-chrome --app-id="kjebfhglflhjjjiceimfkgicifkhjlnm"


Then at Key Binding tab, set the corresponding Run command to Ctrl+Alt+N or any other hotkey you like.


4-linux-compiz-keyboard-shortcuts


This example assumes Google Chrome. If you use Chromium, change the path to /usr/bin/chromium-browser. Please accommodate it to your needs.


Now that with the Hotkey set, it is very easy to run more than 1 instance of the app to compare and edit different notes at the same time using AeroSnap (Windows) or the Grid plug-in for Compiz (Linux) to cut Scratchpad windows into specific sizes and move them to new locations.


5. Always on Top Windows — Chrome OS Panels


5-chrome-os-panels


Panel is a component of Chrome OS which eases multi-tasking. (Image source: The Chromium Project)


Chrome OS has a neat design called Panels which are windows (of apps such as note-taking, music playback controls, chat) that are always in front of other windows. However, Google only leaves this feature for Chrome OS devices. What about us Chrome browser users? Yes we can! (with any of the following tools.)


Method 1: VirtuaWin


Method one is simpler to set up, while method two is more handy but more advanced.


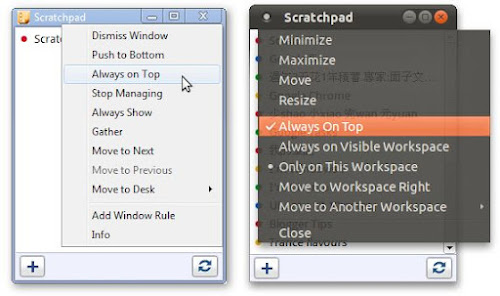
VirtuaWin is a useful Virtual Desktop app for Windows, but today we're only going to use one of its side-features — setting windows always on top. After downloading and installing it, middle-click the title bar of any app (e.g. Scratchpad) and select "Always on Top" as the below picture.


Ubuntu Equivalent


Ubuntu users can quickly change the "Always on Top" status of any window with keyboard shortcut: Alt+Space then T, or by right-clicking the title bar and select "Always on Top".


5-virtuawin-windows-compiz-linux-always-on-top.png


For Windows users (left picture), middle-click shows the appmenu (of VirtuaWin); for Ubuntu users (right picture), right-click or Alt+Space shows the appmenu (a built-in function of the OS).


Method 2: AutoHotkey


While the above method requires extra mouse/keyboard operations, this one doesn't require them at all. Just boot up the PC then launch Scratchpad using hotkey Ctrl+Alt+N. By the time Scratchpad arrives, it's already always on top! And there's a bonus feature: we can toggle the "Always on Top" status of any window by pressing Alt+Shift+T. To achieve this, simply download this compiled AutoHotkey executable and put it in the 'Startup' folder (which can be accessed by pressing WinKey+R and typing 'shell:startup' in the Run prompt.)


AutoHotkey users may customize this .ahk script to suit your needs, such as changing the hotkey combination (marked in red):


; Always-on-Top Panels for Scratchpad (Google Chrome)
; AutoHotkey script by wandersick 8-Feb-2011 [Revised on 7-Apr]
;
; goals
; 1. ctrl+alt+n to launch scratchpad
; 2. automatically always on top (like panels in ChromeOS)
; 3. alt+shift+t to toggle always on top status in any window
;
; supports:
; - Windows from XP to 7 (by junction)
; - enterprise and regular installation of Chrome
; - multiple instances but the latter run instances will only
; be set to always-on-top when the currently active
; (topmost) window is not a last instance of scratchpad
;
; before this will work, ensure appropiate version of Chrome
; and Scratchpad are installed and account sync is enabled.

Chrome=Google\Chrome\Application\chrome.exe

IfExist,%programFiles%\%Chrome%
Browser=%programFiles%\%Chrome%

IfExist,%userProfile%\Local Settings\Application Data\%Chrome%
Browser=%userProfile%\Local Settings\Application Data\%Chrome%

^!n::
Run, "%Browser%" --app-id="kjebfhglflhjjjiceimfkgicifkhjlnm"
WinWaitActive,Scratchpad
WinSet, AlwaysOnTop, On, A
Return

+!t::Winset, AlwaysOnTop, Toggle, A


Linux equivalent: Go to CompizConfig Settings Manager > Windows Management > Windows Rules:


5-compiz-window-rules-above-always-on-top-scratchpad


Under 'Matches' tab, 'Above' row, enter: title=^Scratchpad$


This is it! Linux rocks. ;)


5-jot-notes-reading-ebooks-scratchpad


After making Scratchpad always on top, note-taking becomes a breeze while reading ebooks/web pages in another app.


6. As an Offline-capable Alternative to Google Tasks


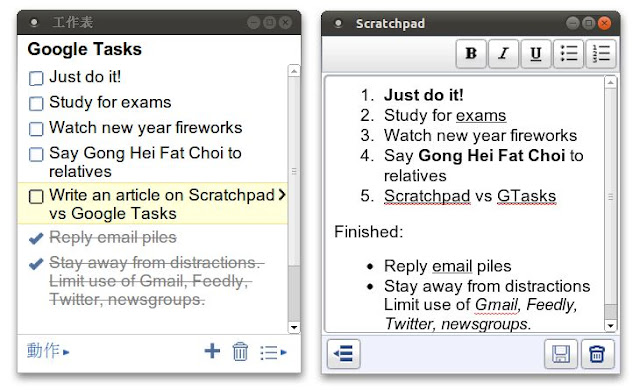
Google Tasks, the handy task management tool built into Gmail and Google Calandar as well as being a standalone application, however until now is still only usable online. (Note: Except iOS where a third-party app 'GeeTasks' can solve the problem). If you don't find the integration between Google services useful, why not use Scratchpad for offline tasks instead?


6-google-tasks-vs-scratchpad


Using Scratchpad as a task management tool also has other advantages, such as Revision History (to see what happened last week, for example), text formatting (although strike-through formatting is not available). Both Scratchpad and Google Tasks offer a menu to choose tasks/notes from.


7. Access Notes Locally as .Doc Files


Despite being an advanced HTML5 web app with offline capability, other than copy-and-paste, Scratchpad unfortunately isn't capable of saving or exporting documents locally. Not to mention there's no way to locally print a note more properly than the method in tip #2. To work around this, we can use Gladinet Cloud Desktop to map Google Docs storage as a local drive in My Computer. (Think of the action as plugging in a giant USB flash disk from the Internet). Notes would then be accessible.


7-gladinet-scratchpad-local-access


Scratchpad notes become .docs files in Gladinet. The archived notes (i.e. notes deleted from Scratchpad) are displayed there as well. However, be careful that use in this way may screw up some notes, e.g. creating dupes, as shown on the right.


Ubuntu equivalent?


Bad News: Gladinet is Windows-only at this moment. Mac users however could use a paid solution, Syncplicity, to achieve similar results, but there's no way to do it on Linux as of now. Good news: Dropbox, the most popular file hosting service, has recently announced in a blog post this feature is being developed. When they roll it out, it will be convenient to many people out there using Dropbox to sync files between the cloud and local computers. Ubuntu and Mac users are benefited because Dropbox is available for those platforms.


(Update: Besides the upcoming Google Drive, now there is one more choice for a Dropbox-like Google Docs client - Insync. Insync supports Windows and Mac OS, while Linux support is coming soon. And it's great to know that such good app is free!)


8. Open Documents Already in Google Docs


Sometimes we might wish Scratchpad could use a document in Google Docs, but it sees nothing other than its own notes, as it is designed to only see things in the 'Scratchpad' folder in Google Docs. Wait a minute. Doesn't that also mean we might be able to turn other documents into Scratchpad notes simply by labelling them 'Scratchpad' or moving them to the Scratchpad folder? (Either in Google Docs or Gladinet.) Yes! It works for simple documents. Don't be tempted to try documents too complex though. Scratchpad isn't designed to handle them!


8-open-snippy-clips-in-scratchpad


In this example, a note clipped using Snippy (Left), a third-party Google Chrome extension that clips web items as Google Docs documents, has been transferred to Scatchpad and opened fine (Right).


9. Revert to Previous Edits with Revision History


Traditionally, before we edit/make changes to a file, it is suggested to back it up first (e.g. saving as a new file with another name) in case things might go wrong later. But with Revision History support of Google Docs there are fewer reasons of doing so now. Google Docs keeps track of changes made to an document and create a backup copy for each version. Although there's no way to access revisions through Scratchpad's interface, it doesn't mean 'restore points' aren't created. (Otherwise Scratchpad wouldn't be so confident not to provide a single 'Save As' button for us!).


9-google-docs-revision-history-2


Revision History on Google Docs web site.


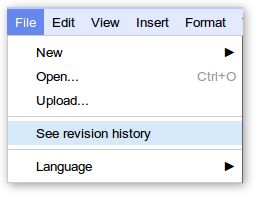
Normally we can access revision history right from the main menu in Google Docs, but the option is gone for notes located in Scratchpad folder. It seems Google may not intend Scratchpad to have this feature? Fortunately, Revision History still can be accessed in the editing mode after any note is opened:


9-google-docs-revision-history-1


10. Search Note Content More Conveniently


As the number of note files grows, sometimes we don't remember where some particular information is. We need content searching across notes (which Ctrl+F does not do).


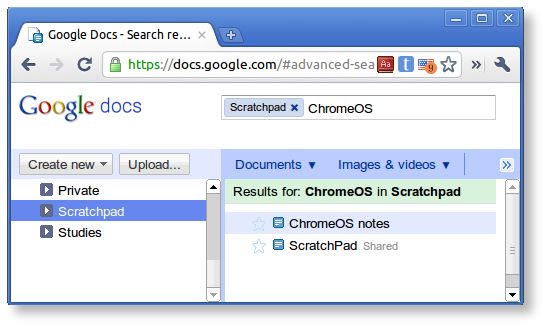
10-search-google-docs


Deep content searching can only be performed on Scratchpad's backend: Google Docs.

(Update: The new version of Scratchpad already has a search filter feature, but the method below has a different use.)


Instead of visiting docs.google.com and perform searches there every single time, we'll demonstrate how to search more efficiently from these common locations:


10-search-google-docs-content


They are: Chrome's Omnibar, Run, Start Menu and Command Prompt (Windows and Ubuntu).


I will demonstrate a way to search all Google Docs documents first, then a way to only search Scratchpad notes.


Windows Method (Start Menu/Run/Command Prompt): Open a notepad. Input the below. Save the file as "docs.bat" (with the double quotes) in your %WinDir% (normally C:\Windows).


@echo off


start "" "https://docs.google.com/?tab=mo&pli=1#search/%*"


Linux Equivalent (Run Application/Terminal): Open a text editor. Input the below. Save the file as doc (in lower-case). Put it in /bin. Grant it execute permission (or run this command in Terminal: sudo chmod +x /bin/doc)


#!/bin/sh


x-www-browser "https://docs.google.com/?tab=mo&pli=1#search/$*"


Alternatively, we could also use the smart omnibar of Chrome, to search the notes.


First, right-click on the omnibar and select 'Edit Search Engines'. At 'Other search engines', add the following details:


10-chrome-omnibar-search-google-docs


  • Add a new search engine: docs (or anything)


  • Keyword: docs


  • URL with %s in place of query: https://docs.google.com/?tab=mo&pli=1#search/%s


Now let's try it! Enter 'docs' followed by a 'space' and the search term to start searching right away!


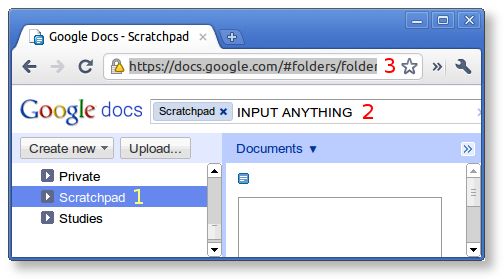
However, searching this way returns results from all Google Docs folders. How to limit the search to Scratchpad folder? The key is in the URL. It needs to include Scratchpad's folder ID:


10-input-anything-google-docs-search


  1. First, click 'Scratchpad' folder on the left


  2. Input anything at the search bar, e.g. "INPUT ANYTHING", then hit "Enter".


  3. Wait until the search is done and copy the new URL. For example, for my computer, it is:


    https://docs.google.com/#advanced-search/q=
    INPUT%20ANYTHING&view=2&parent=folder.0.0BxiWwW3uQiAZccAA9KCSSM


Finally, change "INPUT%20ANYTHING" or anything you inputted to "%s", for example:


https://docs.google.com/#advanced-search/q=
%s&view=2&parent=folder.0.0BxiWwW3uQiAZccAA9KCSSM


Replace the old URL with the new one. Done!


Note: It will not work if you use the above URL; you must create your own because it is differernt for everyone.


Conclusion


So this is the end of my "2-part tribute" to the useful note-taking app: Scratchpad. (First part is here.) I hope you enjoyed Scratchpad as much as I did! Please leave a comment if you have any questions or a tip to share.


You may bookmark or share this article using the following:


Share

Share/Bookmark

Tuesday, February 13, 2001

Google Chrome's Scratchpad - the Revolutionary Notepad

(閱讀中文版)


Do you take notes? If you do, I believe you must have once been on the lookout for a quick and good note-taking app as I were. Now that I've found it, I can't wait to share with you a brilliant notepad - Scratchpad!


Scratchpad


Google Chrome's Scratchpad is what Notepad would be if redesigned from the ground up today. In the old days we might use Notepad because of its speed, despite putting up with its lack of features. We worry about our work being unsaved so our reflex always nervously triggers us to s-s-save it. Also, we want to create copies for backup/reverting changes, so once in a while we have to remind ourself to click the "Save as" button and think up a new file name. Futhermore, we want the document to sync across places so we put it in Dropbox or our USB flash disk to carry with us. And, oh no, we haven't even talked about writing yet! How much productivity is lost in all this? Can't we simply focus on writing itself?


Comes Scratchpad, the revolutionary notepad that solves ALL of this. (Yes, it's true) Scratchpad is a lightweight and fast, free, cross-platform, sync-capable (with Google Docs), note-taking web app with offline capability, spell check and basic formatting support. It fulfills the 3S goals of Google's Chrome browser perfectly - speedy, simple, secure.


Cross-platform Ubuntu and Windows


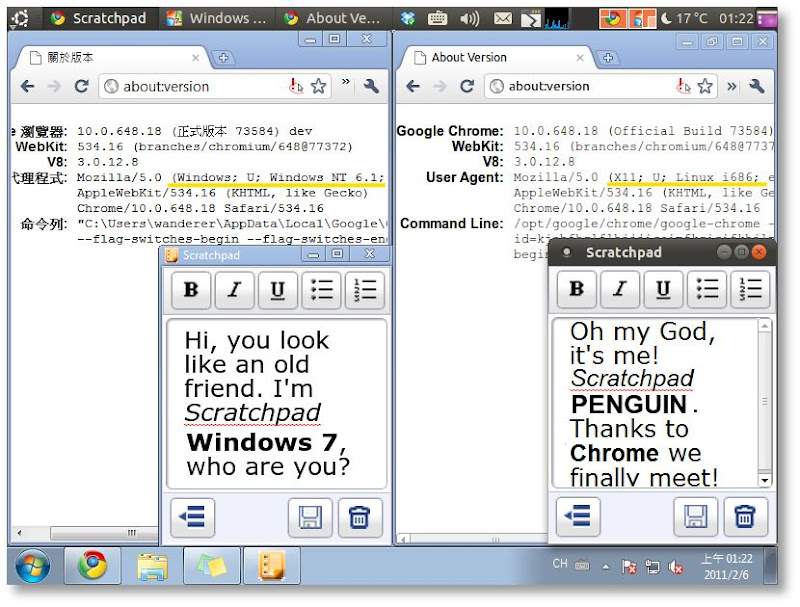
Windows 7 and Ubuntu (hence the 'Penguin'), showcasting the cross-platform capability of Scratchpad (and any Chrome apps).


Speed

  • Quickly jotting down ideas thanks to its Notepad-esque speed and much more powerful features.


Simplicity


  • Traditional tasks like file saving and naming, backing up before revising a document, copying the same file to all computers and keeping it updated, locating file from disk with file explorer, etc, are a past tense.

  • We can finally truly focus on writing, thanks to Scratchpad features such as automatic saving (no dialog appears in front of users), automatic backup (older versions can be reverted in revision history of Google Docs), automatic cloud-syncing (same experience everywhere), and built-in note manager (access or search all notes without an external file explorer).


Security


Connection to Google Docs is encrypted (HTTPS)


  1. Connection to Google Docs server is encrypted. Others cannot decode the message transferred.

  2. Google Chrome implements the sandbox mechanism. Apps are isolated from outside risks such as virus.


Yes, Scratchpad is an official Google Chrome app, integrated in the Chrome OS, available for free on the Chrome Web Store for Chrome browser users. Uninterested now knowing it is for Chrome? Don't be. Even if you may not be a Chrome user, this app will also benefit you. Read on to find out how to run Scratchpad without Chrome.


Installation and Basic Usage


1. Install the Google Chrome browser here. Then install Scratchpad over Chrome Web Store here. You will be asked to logon to Google if you're a first-timer.


Scratchpad on the Chrome Web Store


Scratchpad on the Chrome Web Store. On the right is the 'Install' button.


2. Scratchpad's icon is now shown on the New Tab page. Double click to run it. Click 'Get started'.


Scratchpad on the New Tab page of Google Chrome


Scratchpad on the New Tab page of Google Chrome. Clicking on it takes us to the program on the right.


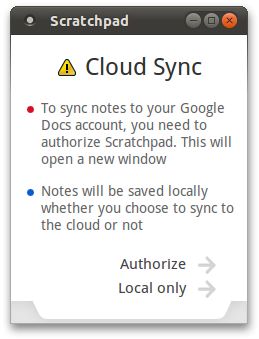
3. Click 'Authorize' if you want to take advantage of bi-directional syncing with Google Docs so that you can access your notes anywhere. You will be asked to grant access to your Google account. Otherwise, click 'Local only', which keeps all notes in the current computer only.


Scratchpad First-run Wizard


Scratchpad first-run wizard. Note there is no way to change this option later besides reinstalling. (Update: In the new Scratchpad this setting can be adjusted in Options.)


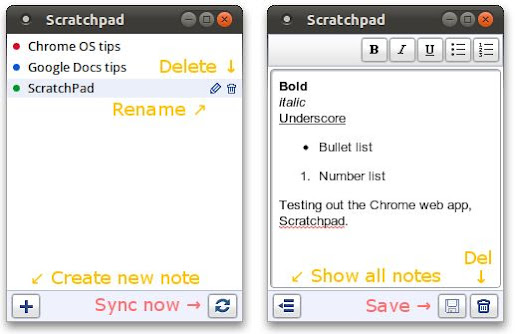
4. Now that Scratchpad is ready for use, this is the work space we will be facing from now on. The interface is very clean and the buttons are very self-explanatory. On the left is the main menu (explorer) where all saved note titles are listed; on the right is the editor. One notable thing is in the highlighted note on the left, where two mini-buttons 'Rename' and 'Delete' are revealed. (There's another 'Delete' button on the right bottom corner of the editor as well).


Scratchpad Menu and Notes


Although there is a 'Sync' button in the menu and a 'Save' button in the editor, the syncing and saving process happens automatically (within a few seconds and 30 seconds respectively) to prevent users from losing any data.


5. When more features are needed, we can always go to Google Docs at http://docs.google.com to access the full editor. Scratchpad notes are placed there in the 'Scratchpad' folder. (In other words, labelled 'Scratchpad'.) After editing, notes will be synced back to Scratchpad.


Scratchpad notes accessed from Google Docs


Notes deleted from Scratchpad are actually archived here as well. Although they appears gone locally, the archived copies are left intact in Google Docs. This behaviour is by design as stated in the official FAQ.


Holy Chrome! I Only Want a Note-taking App, Not Chrome


Heard this is a Chrome app and became uninterested? You don't have to be a Chrome fan to use Scratchpad; you can still use your favorite Firefox/Safari/Opera/Internet Explorer to browse the Internet, because Scratchpad can be used outside Google Chrome just like a traditional desktop app. If you are on the Dev or Beta channel of Google Chrome, you might have already known this function for a while. Finally stable-channel Chrome users can now enjoy it too, thanks to the recently released Google Chrome 9 Stable which offers the option to create shortcuts on Desktop, Application Menu and Quick Launch, making the details of a web app totally transparent to users.


Create Shortcuts for Scratchpad


On the New Tab page, click the wrench icon on the app icon and select 'Create shortcut'.


Conclusion


Scratchpad is the productive kind of app that's used all the time once we've got used to it. Personally, I find Scratchpad runs as quickly as Notepad, has support for basic text formatting, cloud-sync, and most of all, it doesn't require any maintenance, so it's now replaced Notepad and Sticky Notes as my number-one note-taking tool. When more features are needed, I'll open Google Docs for "post-processing". (When Chrome OS gets released later this year, the long-awaited HTML5 offline mode of Google Docs may get released too! Looking forward to that.)


Cloud computing and cross-platform dream are not futuristic or just an enterprise thing anymore, but a reality to really enhance our life. I sincerely recommend Scratchpad as the new-era notepad.


I hope you are as passionate as I am reading about Scratchpad. Before I go, I'd like to share one more tip with you. If you are as easily distracted as I am, try pressing F11 to switch to a distraction-free full screen editing environment. So many times this has made me more focused working with Scratchpad. Give it a try! If you want more tips, please read my next post "10 Tips for Utilizing Scratchpad of Google Chrome".


Special report: The save button in the current version of Scratchpad is not working. (Update: The problem has been fixed) This is a known bug. For now, the only way to save note is the keyboard shortcut Ctrl+S. Waiting a few seconds does it too. (Unless it feels better relying on our own hands!)


Feature Summary


  • As clean-looking and fast as Notepad yet much more powerful.


  • New type of web app with offline capability (HTML5). (It can be considered as a simplified Google Docs editor with offline capability until the true Google Docs offline mode is out)


  • Bi-directional syncing with Google Docs. (Not just exporting like some apps do)


  • Free and cross-platform; notes can be synchronized across Chrome OS, Linux, Mac, Windows


  • Notes are accessible on docs.google.com on any Internet devices


  • Multiple instances possible to compare and edit more notes at the same time


  • Auto program updating (always latest version with new features and bug fixes)


  • Simple text formatting: bold, italic, underline and lists


  • Spell check


  • Built-in menu to access and search all notes. (No need for an external file explorer)


  • Auto saving (every few seconds), auto syncing (every 30 seconds)


  • Secure sandbox technology.


  • Secure encrypted connections to Google servers.


  • Official Google app. (Enough said!)


You may bookmark or share this article using the following:


Share

Share/Bookmark

Sunday, September 5, 1999

Enhanced Command Prompt Portable

按此閱讀這文章的中文版


Do you use a lot of command line tools in your USB flash drive?


Command-line utilities

So, as a system administrator, you probably have got a bunch of useful command line tools with you on the go. To use them, you first plug in your USB flash drive, start the command prompt on the target computer, navigate to your drive, then find out where your program is, 'cd' to it and finally start it. But you're always using them, and as the list of executables and subfolders grows, you start to wonder whether there's an easier way. Command Prompt Portable to the rescue!


Command Prompt Portable is another portable software from PortableApps.com. It gives us a command prompt we can customize the way we want; one of the most useful customization is setting PATH to whatever locations we need. We simply edit a batch file called commandprompt.bat inside "CommandPromptPortable\Data\Batch" and set PATH to e.g. "%~d0\C7PE\app\Cmd\Exe", ... where we put our executables. "%~d0" will become the root of the USB drive automatically. Then we can use our commands right after we've opened Command Prompt Portable, no matter at which PC! So, insteading of getting frustrated with target computer's command prompt, we can actually bring our own and have our settings on the go.


To go further, here's my enhanced Command Prompt Portable with PStart as a launcher.


Enhanced Command Prompt Portable, ECPP 1.0, PStart


(The screen shot shown is Chinese but the downloadable version is in English)


The executables (.exe .bat .cmd .vbs...) I put inside my "CommandPromptPortable\Exe" folder displays as file1.exe file2.bat... while folders display as [dir1], [dir2]... I like to group my executables as there're a lot of them. My script makes it such that as long as I remember the name of an executable inside any subfolder, I can type and run it without going into the sub-sub-subfolder. No more need to edit commandprompt.bat for each new folder. It achieves this by dynamically setting PATH to all subfolders that contain executables where command prompt is run each time.


An optional feature is that only folders with executables inside will be appended to PATH, meaning PATH will be shorter, consuming less memory, searching faster. However, the disadvantage is startup time being slower due to extra processing. To enable it, see "commandprompt.bat /?".


The following maps the relationship between folders and PATH. Note the green line especially, while there are many folders inside UnxUtils, only "bin" and "wbin" are appended to PATH. That's because only those 2 folders contain executables.


Location is handled by PATH now, but what if I don't remember the name of the executable? Then I would first need to see what's inside subfolders using Dirc or Listc command.


This is a sample output of what's inside [Microsoft] and [PnP] folders -- "listc Microsoft Pnp"


Alternatively, in Dir /w style using Dirc -- "dirc Microsoft Netcat

By default, only executables (defined as .exe .bat .cmd .vbs...) are shown.


Features Summary:


  • Display a welcome message when Command Prompt Portable is run, where it also shows a list of command line executables placed inside "CommandPromptPortable\Exe\" in the USB drive. Root executables are listed as file1.exe, file2.bat, ... folders are listed as [Folder1], [Folder2]...


  • PATH is automatically and dynamically updated on each run (to detect new executables)

  • No need to edit commandprompt.bat for each new folder


  • Only folders with executables is appended to PATH to save space (optional)


  • Groups command line executables into folders (to avoid bleeding)

  • Work with DirC.bat and ListC.bat to list executables in specified [folder(s)] to easily know the name of the executables that can be run, e.g. "listC linux windows" (or dirc) would show all executables inside [linux] and [windows] folders

  • Doesn't depend on a static location. Command Prompt Portable can be placed anywhere.


(Note: All scripts inside "Data\Batch\" are my work)


You can download my customized Command Prompt Portable here with a few free executables included and use for yourself.


* Download here | MD5: 3930227f85901741c7c20911a92dca3c


You may bookmark or share this article using the following:


Share
Share/Bookmark

Friday, August 13, 1999

VirtuaWin: Another Virtual Desktop Usage

Windows 7 Thumbnails

(Wanted to close all Windows Explorers with a single click, but dare not during file transfer)


I'm the kind who opens a new Windows Explorer whenever I need to go to another folder, instead of locating from an existing one. Sometimes I end up opening a lot of Windows that I'd want to close together with the "Close All" function. However, sometimes during file transfers or other processing (taking ownership, changing attributes, etc) I can't afford to stop it. Here Virtual Desktop helps by moving the critical mission to another desktop without stopping them, now I can close the rest of the Windows!


Also this feature is also good for people under stress. Who wouldn't feel frustrated and tired looking at their taskbar full of tasks? Why not move them to another desktop and feel fresh with a new desktop? For example, during writing Windows notifies me one of my harddrive is dying. While I decided to do data recovery, that takes a long time with the progress bar and alien machine codes, so I just move away the recovery to another desktop. Mind freed.

Windows 7 ThumbnailsWindows 7 Thumbnails

(With the Windows separated to different desktops I can bravely Close all Window Explorers on desktop 2 now)

For virtual desktop, I use VirtuaWin because I love it can switch screen by pressing alt + moving mouse at the edges of the screen.


虛擬桌面 + 遠端桌面的妙合


You may bookmark or share this item with the help of the below:


Share

Share/Bookmark

Thursday, October 29, 1998

Manually Prepare Drive for Windows Vista BitLocker

Ever since knowing BitLocker can be used without a TPM chip (instead, with a startup USB key), I wanted to give it a try on my old Pentium M notebook.


BitLocker


Since BitLocker requires a second partiton (of 1.5GB) that is unencrypted in order to store the encryption keys and stuff, users who didn't configure their hard drive during installation of Vista will have to do it another way.


Vista Ultimate offers a tool called BitLocker Drive Preparation Tool (as a Windows Update Extra). All it does is automate the process of setting up a second partiton:


  1. Shrinking C: (or unpartitoned space if there is any, and at least 1.5GB)

  2. Assign it letter 'S:'

  3. Set it 'active'

  4. Change a {bootmgr} entry in the BCD and move the 'BOOTMGR' file and 'BOOT' folder to that partition


For users of Vista Business, they have to complete the above procedures manually.


It involves 3 tools. "Disk Management" (graphical interface), "BCDEdit.exe", and "BootSect.exe" (command line interface)


Part 1: Defrag and Disk Management


  1. Before we begin, make sure the disk is fully dedragmented (e.g. by using: defrag /c /w /f)

  2. Run "Disk Management" tool by typing "diskmgmt.msc" at "Start Search".

  3. Right click C: (the Vista system partition) and select "Shrink". Free at least 1.5GB space.

  4. Create a primary partition from the unpartitioned space and format it as NTFS and assign it letter S:

  5. Right click and select "Mark this partition as 'active'.


Part 2: BCDEdit.exe


  1. Before using the tool, copy BOOTMGR (file) and BOOT (folder) from the root of C: to that of S:. It will warn that some files in the BOOT folder can't be copied. They will be copied with the bcdedit.exe tool in step 4. Confirm at least BOOTMGR is copied now.

  2. Run "cmd.exe" as administrator by typing "cmd" at "Start Search" and pressing Ctrl+Shift+Enter to open it.

  3. Assume Vista is on C:, enter

    bcdedit /set {bootmgr} device partition=S:

  4. To copy the BCD that couldn't be copied in step 1, enter

    bcdedit /export "S:\BOOT\BCD"


Part 3: BootSect.exe


  1. At the command prompt, enter: bootsect /nt60 s:

  2. Done.


Seems this method is still unofficial after all. Some error message showed when I tried entering "bcdedit", but after entering the following, it is back to normal:


bcdedit /import "S:\BOOT\BCD"


Notes


  1. Please don't try it without data backup. Not guaranteed to work but it works here.

  2. Don't try it with a Vista-Loader-cracked Vista. It changes the active primary partition hence the crack would probably fail.

  3. Bitlocker will reboot to check whether the system is capable of accessing USB devices at boot time before it encrypts the partition.


Afterthoughts


Turns out my notebook (Sony TR1) is too old. It doesn't detect USB at boot (BitLocker without TPM requires a USB startup key), so it failed. Maybe TrueCrypt 6 would be friendlier needing just a startup PIN to get it to work...


You can bookmark or share this article using the following:


Share
Share/Bookmark


wander-sick Copyright © 2012 Fast Loading -- Powered by Blogger