Warung Bebas

Tuesday, February 13, 2001

Google Chrome's Scratchpad - the Revolutionary Notepad

(閱讀中文版)


Do you take notes? If you do, I believe you must have once been on the lookout for a quick and good note-taking app as I were. Now that I've found it, I can't wait to share with you a brilliant notepad - Scratchpad!


Scratchpad


Google Chrome's Scratchpad is what Notepad would be if redesigned from the ground up today. In the old days we might use Notepad because of its speed, despite putting up with its lack of features. We worry about our work being unsaved so our reflex always nervously triggers us to s-s-save it. Also, we want to create copies for backup/reverting changes, so once in a while we have to remind ourself to click the "Save as" button and think up a new file name. Futhermore, we want the document to sync across places so we put it in Dropbox or our USB flash disk to carry with us. And, oh no, we haven't even talked about writing yet! How much productivity is lost in all this? Can't we simply focus on writing itself?


Comes Scratchpad, the revolutionary notepad that solves ALL of this. (Yes, it's true) Scratchpad is a lightweight and fast, free, cross-platform, sync-capable (with Google Docs), note-taking web app with offline capability, spell check and basic formatting support. It fulfills the 3S goals of Google's Chrome browser perfectly - speedy, simple, secure.


Cross-platform Ubuntu and Windows


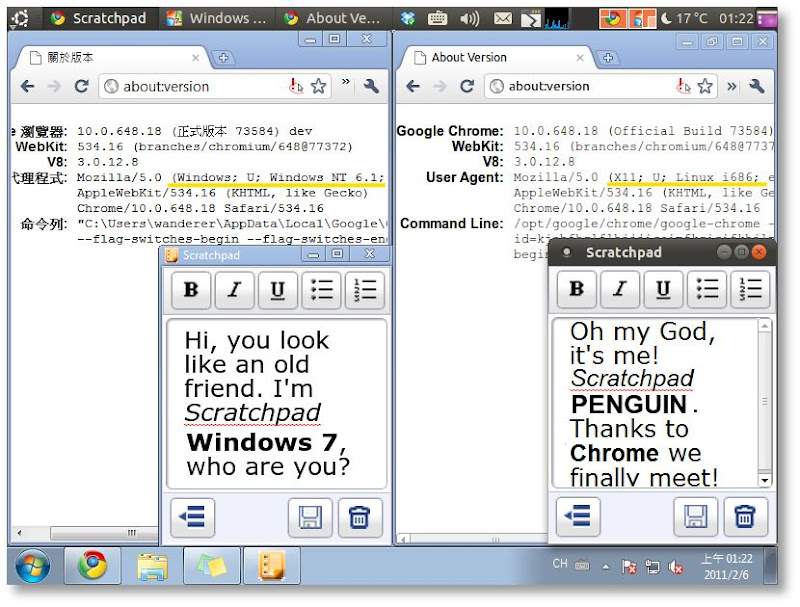
Windows 7 and Ubuntu (hence the 'Penguin'), showcasting the cross-platform capability of Scratchpad (and any Chrome apps).


Speed

  • Quickly jotting down ideas thanks to its Notepad-esque speed and much more powerful features.


Simplicity


  • Traditional tasks like file saving and naming, backing up before revising a document, copying the same file to all computers and keeping it updated, locating file from disk with file explorer, etc, are a past tense.

  • We can finally truly focus on writing, thanks to Scratchpad features such as automatic saving (no dialog appears in front of users), automatic backup (older versions can be reverted in revision history of Google Docs), automatic cloud-syncing (same experience everywhere), and built-in note manager (access or search all notes without an external file explorer).


Security


Connection to Google Docs is encrypted (HTTPS)


  1. Connection to Google Docs server is encrypted. Others cannot decode the message transferred.

  2. Google Chrome implements the sandbox mechanism. Apps are isolated from outside risks such as virus.


Yes, Scratchpad is an official Google Chrome app, integrated in the Chrome OS, available for free on the Chrome Web Store for Chrome browser users. Uninterested now knowing it is for Chrome? Don't be. Even if you may not be a Chrome user, this app will also benefit you. Read on to find out how to run Scratchpad without Chrome.


Installation and Basic Usage


1. Install the Google Chrome browser here. Then install Scratchpad over Chrome Web Store here. You will be asked to logon to Google if you're a first-timer.


Scratchpad on the Chrome Web Store


Scratchpad on the Chrome Web Store. On the right is the 'Install' button.


2. Scratchpad's icon is now shown on the New Tab page. Double click to run it. Click 'Get started'.


Scratchpad on the New Tab page of Google Chrome


Scratchpad on the New Tab page of Google Chrome. Clicking on it takes us to the program on the right.


3. Click 'Authorize' if you want to take advantage of bi-directional syncing with Google Docs so that you can access your notes anywhere. You will be asked to grant access to your Google account. Otherwise, click 'Local only', which keeps all notes in the current computer only.


Scratchpad First-run Wizard


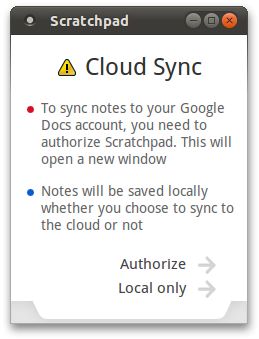
Scratchpad first-run wizard. Note there is no way to change this option later besides reinstalling. (Update: In the new Scratchpad this setting can be adjusted in Options.)


4. Now that Scratchpad is ready for use, this is the work space we will be facing from now on. The interface is very clean and the buttons are very self-explanatory. On the left is the main menu (explorer) where all saved note titles are listed; on the right is the editor. One notable thing is in the highlighted note on the left, where two mini-buttons 'Rename' and 'Delete' are revealed. (There's another 'Delete' button on the right bottom corner of the editor as well).


Scratchpad Menu and Notes


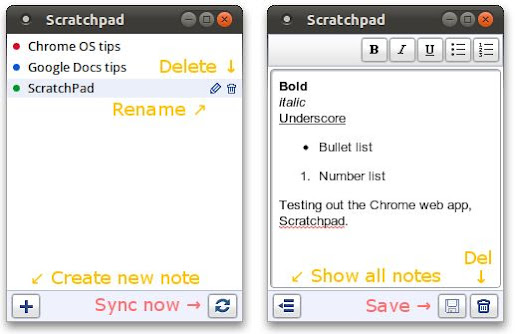
Although there is a 'Sync' button in the menu and a 'Save' button in the editor, the syncing and saving process happens automatically (within a few seconds and 30 seconds respectively) to prevent users from losing any data.


5. When more features are needed, we can always go to Google Docs at http://docs.google.com to access the full editor. Scratchpad notes are placed there in the 'Scratchpad' folder. (In other words, labelled 'Scratchpad'.) After editing, notes will be synced back to Scratchpad.


Scratchpad notes accessed from Google Docs


Notes deleted from Scratchpad are actually archived here as well. Although they appears gone locally, the archived copies are left intact in Google Docs. This behaviour is by design as stated in the official FAQ.


Holy Chrome! I Only Want a Note-taking App, Not Chrome


Heard this is a Chrome app and became uninterested? You don't have to be a Chrome fan to use Scratchpad; you can still use your favorite Firefox/Safari/Opera/Internet Explorer to browse the Internet, because Scratchpad can be used outside Google Chrome just like a traditional desktop app. If you are on the Dev or Beta channel of Google Chrome, you might have already known this function for a while. Finally stable-channel Chrome users can now enjoy it too, thanks to the recently released Google Chrome 9 Stable which offers the option to create shortcuts on Desktop, Application Menu and Quick Launch, making the details of a web app totally transparent to users.


Create Shortcuts for Scratchpad


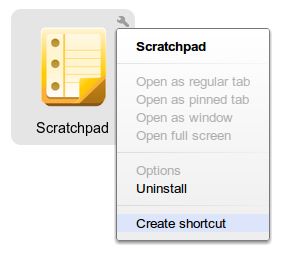
On the New Tab page, click the wrench icon on the app icon and select 'Create shortcut'.


Conclusion


Scratchpad is the productive kind of app that's used all the time once we've got used to it. Personally, I find Scratchpad runs as quickly as Notepad, has support for basic text formatting, cloud-sync, and most of all, it doesn't require any maintenance, so it's now replaced Notepad and Sticky Notes as my number-one note-taking tool. When more features are needed, I'll open Google Docs for "post-processing". (When Chrome OS gets released later this year, the long-awaited HTML5 offline mode of Google Docs may get released too! Looking forward to that.)


Cloud computing and cross-platform dream are not futuristic or just an enterprise thing anymore, but a reality to really enhance our life. I sincerely recommend Scratchpad as the new-era notepad.


I hope you are as passionate as I am reading about Scratchpad. Before I go, I'd like to share one more tip with you. If you are as easily distracted as I am, try pressing F11 to switch to a distraction-free full screen editing environment. So many times this has made me more focused working with Scratchpad. Give it a try! If you want more tips, please read my next post "10 Tips for Utilizing Scratchpad of Google Chrome".


Special report: The save button in the current version of Scratchpad is not working. (Update: The problem has been fixed) This is a known bug. For now, the only way to save note is the keyboard shortcut Ctrl+S. Waiting a few seconds does it too. (Unless it feels better relying on our own hands!)


Feature Summary


  • As clean-looking and fast as Notepad yet much more powerful.


  • New type of web app with offline capability (HTML5). (It can be considered as a simplified Google Docs editor with offline capability until the true Google Docs offline mode is out)


  • Bi-directional syncing with Google Docs. (Not just exporting like some apps do)


  • Free and cross-platform; notes can be synchronized across Chrome OS, Linux, Mac, Windows


  • Notes are accessible on docs.google.com on any Internet devices


  • Multiple instances possible to compare and edit more notes at the same time


  • Auto program updating (always latest version with new features and bug fixes)


  • Simple text formatting: bold, italic, underline and lists


  • Spell check


  • Built-in menu to access and search all notes. (No need for an external file explorer)


  • Auto saving (every few seconds), auto syncing (every 30 seconds)


  • Secure sandbox technology.


  • Secure encrypted connections to Google servers.


  • Official Google app. (Enough said!)


You may bookmark or share this article using the following:


Share

Share/Bookmark

Sunday, September 5, 1999

Enhanced Command Prompt Portable

按此閱讀這文章的中文版


Do you use a lot of command line tools in your USB flash drive?


Command-line utilities

So, as a system administrator, you probably have got a bunch of useful command line tools with you on the go. To use them, you first plug in your USB flash drive, start the command prompt on the target computer, navigate to your drive, then find out where your program is, 'cd' to it and finally start it. But you're always using them, and as the list of executables and subfolders grows, you start to wonder whether there's an easier way. Command Prompt Portable to the rescue!


Command Prompt Portable is another portable software from PortableApps.com. It gives us a command prompt we can customize the way we want; one of the most useful customization is setting PATH to whatever locations we need. We simply edit a batch file called commandprompt.bat inside "CommandPromptPortable\Data\Batch" and set PATH to e.g. "%~d0\C7PE\app\Cmd\Exe", ... where we put our executables. "%~d0" will become the root of the USB drive automatically. Then we can use our commands right after we've opened Command Prompt Portable, no matter at which PC! So, insteading of getting frustrated with target computer's command prompt, we can actually bring our own and have our settings on the go.


To go further, here's my enhanced Command Prompt Portable with PStart as a launcher.


Enhanced Command Prompt Portable, ECPP 1.0, PStart


(The screen shot shown is Chinese but the downloadable version is in English)


The executables (.exe .bat .cmd .vbs...) I put inside my "CommandPromptPortable\Exe" folder displays as file1.exe file2.bat... while folders display as [dir1], [dir2]... I like to group my executables as there're a lot of them. My script makes it such that as long as I remember the name of an executable inside any subfolder, I can type and run it without going into the sub-sub-subfolder. No more need to edit commandprompt.bat for each new folder. It achieves this by dynamically setting PATH to all subfolders that contain executables where command prompt is run each time.


An optional feature is that only folders with executables inside will be appended to PATH, meaning PATH will be shorter, consuming less memory, searching faster. However, the disadvantage is startup time being slower due to extra processing. To enable it, see "commandprompt.bat /?".


The following maps the relationship between folders and PATH. Note the green line especially, while there are many folders inside UnxUtils, only "bin" and "wbin" are appended to PATH. That's because only those 2 folders contain executables.


Location is handled by PATH now, but what if I don't remember the name of the executable? Then I would first need to see what's inside subfolders using Dirc or Listc command.


This is a sample output of what's inside [Microsoft] and [PnP] folders -- "listc Microsoft Pnp"


Alternatively, in Dir /w style using Dirc -- "dirc Microsoft Netcat

By default, only executables (defined as .exe .bat .cmd .vbs...) are shown.


Features Summary:


  • Display a welcome message when Command Prompt Portable is run, where it also shows a list of command line executables placed inside "CommandPromptPortable\Exe\" in the USB drive. Root executables are listed as file1.exe, file2.bat, ... folders are listed as [Folder1], [Folder2]...


  • PATH is automatically and dynamically updated on each run (to detect new executables)

  • No need to edit commandprompt.bat for each new folder


  • Only folders with executables is appended to PATH to save space (optional)


  • Groups command line executables into folders (to avoid bleeding)

  • Work with DirC.bat and ListC.bat to list executables in specified [folder(s)] to easily know the name of the executables that can be run, e.g. "listC linux windows" (or dirc) would show all executables inside [linux] and [windows] folders

  • Doesn't depend on a static location. Command Prompt Portable can be placed anywhere.


(Note: All scripts inside "Data\Batch\" are my work)


You can download my customized Command Prompt Portable here with a few free executables included and use for yourself.


* Download here | MD5: 3930227f85901741c7c20911a92dca3c


You may bookmark or share this article using the following:


Share

Share/Bookmark

Friday, August 13, 1999

VirtuaWin: Another Virtual Desktop Usage

Windows 7 Thumbnails

(Wanted to close all Windows Explorers with a single click, but dare not during file transfer)


I'm the kind who opens a new Windows Explorer whenever I need to go to another folder, instead of locating from an existing one. Sometimes I end up opening a lot of Windows that I'd want to close together with the "Close All" function. However, sometimes during file transfers or other processing (taking ownership, changing attributes, etc) I can't afford to stop it. Here Virtual Desktop helps by moving the critical mission to another desktop without stopping them, now I can close the rest of the Windows!


Also this feature is also good for people under stress. Who wouldn't feel frustrated and tired looking at their taskbar full of tasks? Why not move them to another desktop and feel fresh with a new desktop? For example, during writing Windows notifies me one of my harddrive is dying. While I decided to do data recovery, that takes a long time with the progress bar and alien machine codes, so I just move away the recovery to another desktop. Mind freed.

Windows 7 ThumbnailsWindows 7 Thumbnails

(With the Windows separated to different desktops I can bravely Close all Window Explorers on desktop 2 now)

For virtual desktop, I use VirtuaWin because I love it can switch screen by pressing alt + moving mouse at the edges of the screen.


虛擬桌面 + 遠端桌面的妙合


You may bookmark or share this item with the help of the below:


Share

Share/Bookmark

Thursday, October 29, 1998

Manually Prepare Drive for Windows Vista BitLocker

Ever since knowing BitLocker can be used without a TPM chip (instead, with a startup USB key), I wanted to give it a try on my old Pentium M notebook.


BitLocker


Since BitLocker requires a second partiton (of 1.5GB) that is unencrypted in order to store the encryption keys and stuff, users who didn't configure their hard drive during installation of Vista will have to do it another way.


Vista Ultimate offers a tool called BitLocker Drive Preparation Tool (as a Windows Update Extra). All it does is automate the process of setting up a second partiton:


  1. Shrinking C: (or unpartitoned space if there is any, and at least 1.5GB)

  2. Assign it letter 'S:'

  3. Set it 'active'

  4. Change a {bootmgr} entry in the BCD and move the 'BOOTMGR' file and 'BOOT' folder to that partition


For users of Vista Business, they have to complete the above procedures manually.


It involves 3 tools. "Disk Management" (graphical interface), "BCDEdit.exe", and "BootSect.exe" (command line interface)


Part 1: Defrag and Disk Management


  1. Before we begin, make sure the disk is fully dedragmented (e.g. by using: defrag /c /w /f)

  2. Run "Disk Management" tool by typing "diskmgmt.msc" at "Start Search".

  3. Right click C: (the Vista system partition) and select "Shrink". Free at least 1.5GB space.

  4. Create a primary partition from the unpartitioned space and format it as NTFS and assign it letter S:

  5. Right click and select "Mark this partition as 'active'.


Part 2: BCDEdit.exe


  1. Before using the tool, copy BOOTMGR (file) and BOOT (folder) from the root of C: to that of S:. It will warn that some files in the BOOT folder can't be copied. They will be copied with the bcdedit.exe tool in step 4. Confirm at least BOOTMGR is copied now.

  2. Run "cmd.exe" as administrator by typing "cmd" at "Start Search" and pressing Ctrl+Shift+Enter to open it.

  3. Assume Vista is on C:, enter

    bcdedit /set {bootmgr} device partition=S:

  4. To copy the BCD that couldn't be copied in step 1, enter

    bcdedit /export "S:\BOOT\BCD"


Part 3: BootSect.exe


  1. At the command prompt, enter: bootsect /nt60 s:

  2. Done.


Seems this method is still unofficial after all. Some error message showed when I tried entering "bcdedit", but after entering the following, it is back to normal:


bcdedit /import "S:\BOOT\BCD"


Notes


  1. Please don't try it without data backup. Not guaranteed to work but it works here.

  2. Don't try it with a Vista-Loader-cracked Vista. It changes the active primary partition hence the crack would probably fail.

  3. Bitlocker will reboot to check whether the system is capable of accessing USB devices at boot time before it encrypts the partition.


Afterthoughts


Turns out my notebook (Sony TR1) is too old. It doesn't detect USB at boot (BitLocker without TPM requires a USB startup key), so it failed. Maybe TrueCrypt 6 would be friendlier needing just a startup PIN to get it to work...


You can bookmark or share this article using the following:


Share

Share/Bookmark


wander-sick Copyright © 2012 Fast Loading -- Powered by Blogger